Setup automation on Prusa MK3
This section will explain how to setup an automated continuous printing on JobOx for Prusa MK3.
There are few different ways how to setup and run an automation process on a JobOx system. Some of them are entirely software based, other requires additional hardware.
The simplest way starting with automation process is by using our inhouse browser based application jobox.app which works online and offline. This method is entirely software based and no additional hardware is needed.
All other methods requires third party hardware or software. Each of them has it strength and weaknesses compared to jobox.app and the choice of a best suitable solution should be met individually based on a certain use case. We are introducing these methods as possible options, however we are not affiliated with any of these service providers or product retailers.
Collapsible content
Jobox.app (software based / free / open source)
Jobox.app is a browser based application which takes multiple GCODE files and merge them together into one single file. The operation is very simple.
- Navigate to jobox.app
- Click on “Choose File” and select one of your GCODE files
- You can increase the “Repeats” number to print one GCODE multiple times
- If you need some more files, you can add more lines to the list by clicking on “+ Add file”
- Lines can be sorted by drag-n-drop…
- and removed using the button on the right.
- You will notice that each line indicates the size of the loaded file …
- There is a scale underneath the list, showing the estimated size of the combined file. It needs to be kept in mind, because the total file size should not exceed 450 MB. Bigger files cannot be loaded by Prusa MK3s.
- Enter a name for your compilation file (if empty an automatic name will be generated).
- Clicking on “Merge files” will combine the files into a one single output file and start the download. The output file can be found in the download directory of your browser.

Using on MK4 with Firmware 5.1+
We got some reports from our users claiming that their MK4 just stops printing on random places when printing with GCODE exported by jobox.app. Our online research showed, that this seems to be a global issue which occurs randomly when printing with classic GCODE. However, this bug seems not affecting BGCODE. We hope this issue will be fixed in the next firmware update from Prusa. For now we can recommend two possible workarounds:
- Downgrade to Firmware 5.0 (maybe 4.9 when issue remains). This is the last firmware not showing this issue.
- Unfortunately jobox.app can not process BGCODE files. But you can use a built-in converter of your Prusa Slicer to overcome this. After merging you regular GCODEs in jobox.app just return to your Prusa Slicer, and click on "File > Convert > Convert ASCII G-code to binary > select your merged GCODE file". This will generate a BGCODE file and save it in the same directory as your GCODE. This BGCODE should work flawlessly and also the size will be significantly reduced.
Data security and privacy
We care about your data security and privacy and that’s why the jobox.app is designed in a way, that your files never leave your computer and are processed locally (on your computer by a technique called JavaScript), even if the user interface runs in a browser.
By the way, you don’t even need internet connection for using jobox.app. You can save it locally and use offline.
Learn how ...
- Navigate to jobox.app
- Right click somewhere on the white space to open a website menu
- Click on “Save as” or “Save page as”
- Select the place where the page should be saved,
- Make sure to select “HTML only” as a “File type” option and click “Save”.
- Now instead navigating to www.jobox.app you can just double-click on this file and using the full functionality offline.
Octoprint (hardware based / free / open source)
OctoPrint is an open source 3D printer controller application, which provides a web interface for the connected printers. It displays printers' status and key parameters and allows user to schedule prints and remotely control the printer. The main advantage of OctoPrint is its ability to operate remotely and there is a huge amount of different plugins like "Continuous Print" introduced in this section. However to run OctoPrint additional hardware is required. In most cases a Raspberry Pi is used but there are also few alternatives. This guidance will only explain how to use JobOx with an existing OctoPrint setup and is aimed at users who already familiar with this system. If you are interested in learn more about OctoPrint in general, please visit octoprint.org.
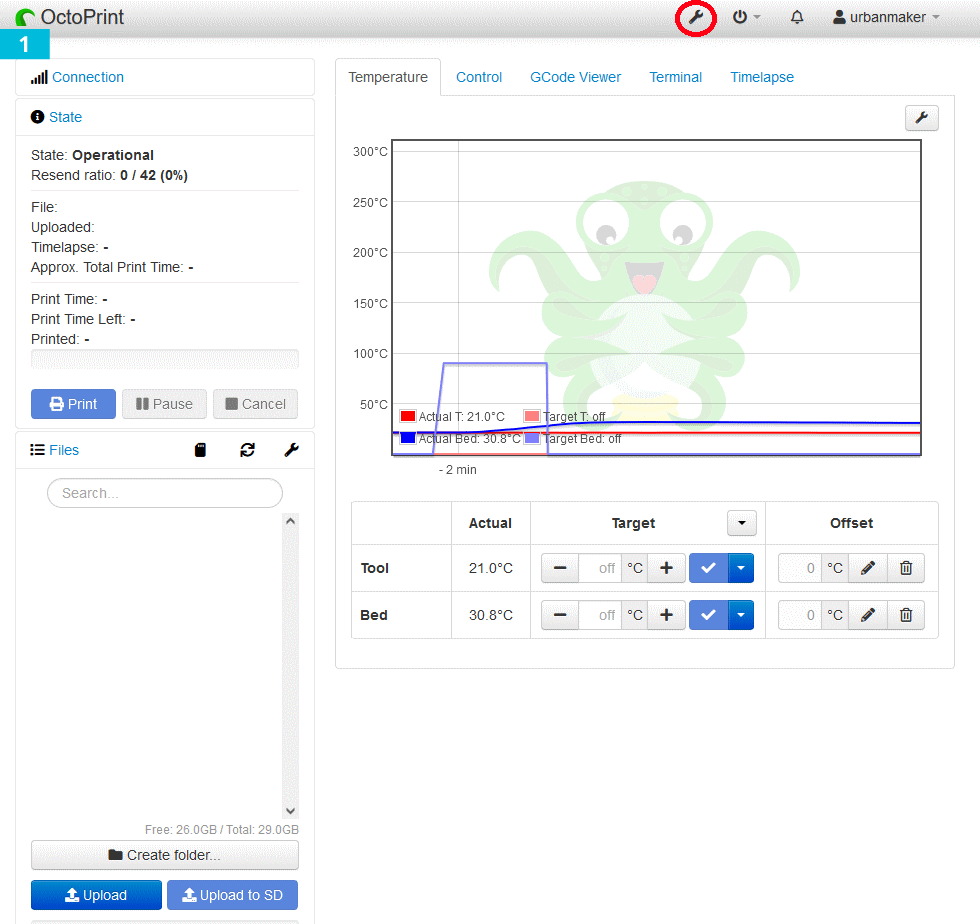
- Click on the wrench icon in the upper right
- On the left side select Plugin Manager tab and then click on „+ Get More“ in the upper right
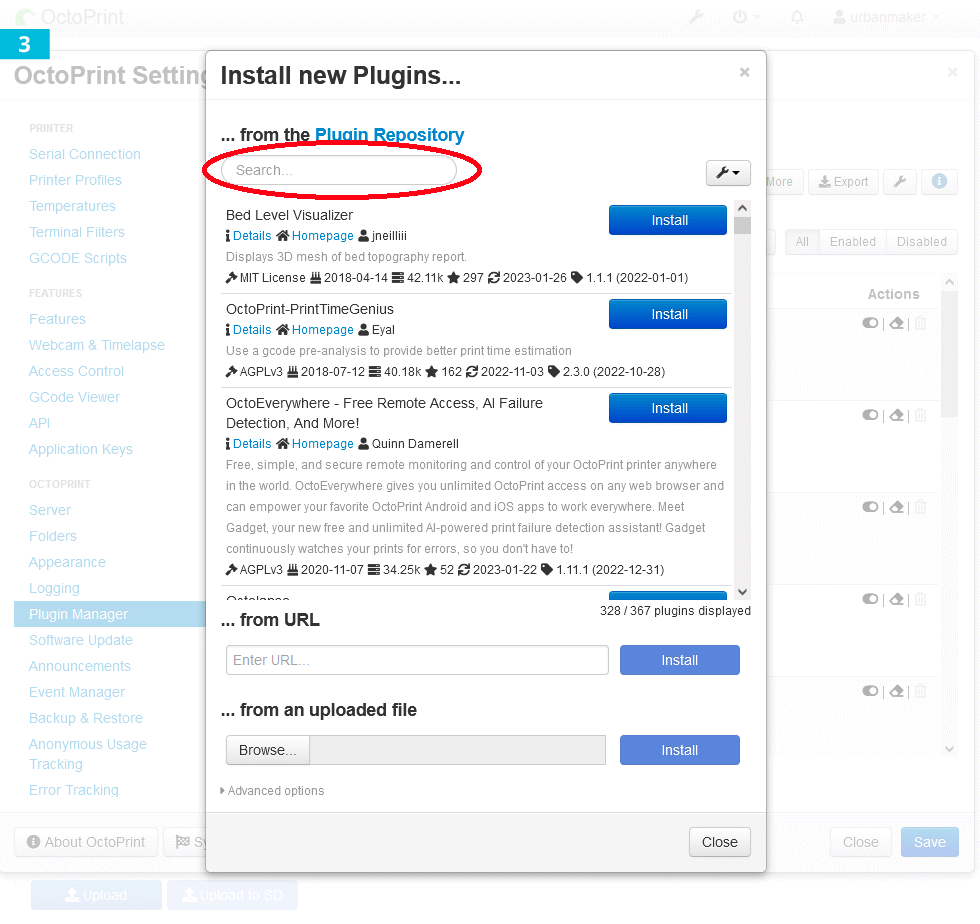
- Click on „Search“
- Enter „Continuous Print“ and then „Install“
- After the installation is finished click („Done!“ appears in the last log line) and a popup appears, click „Restart now“
- Confirm by clicking "Proceed"
- After the Raspberry Pi is restarted, click on „Reload now“
- Click on the wrench icon in the upper right again
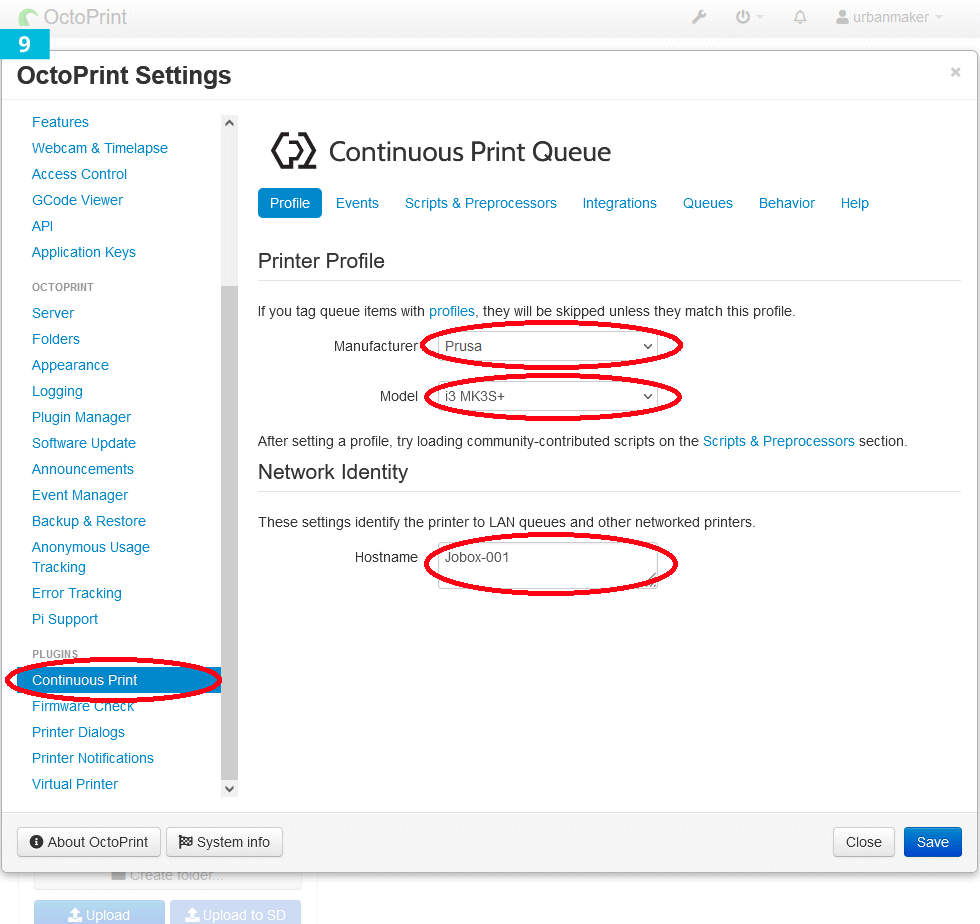
- Select „Continuous Print“ tab in the plugins section (left side), than click on "Profiles" tab. Select Profile Prusa, i3 MK3S+ and choose some name (e.g. JobOx 01).
- Now choose „Scripts & Preprocessors“ tab. Click on the edit-icon of the „Bed Clearing“ line
- Remove GCODE lines starting with "M18..." and "@pause..." like shown on screenshots
- Confirm by clicking „Done“
- Select the tab "Behavior" set „Upload Action“ to „Do nothing“ confirm by pressing „Save“
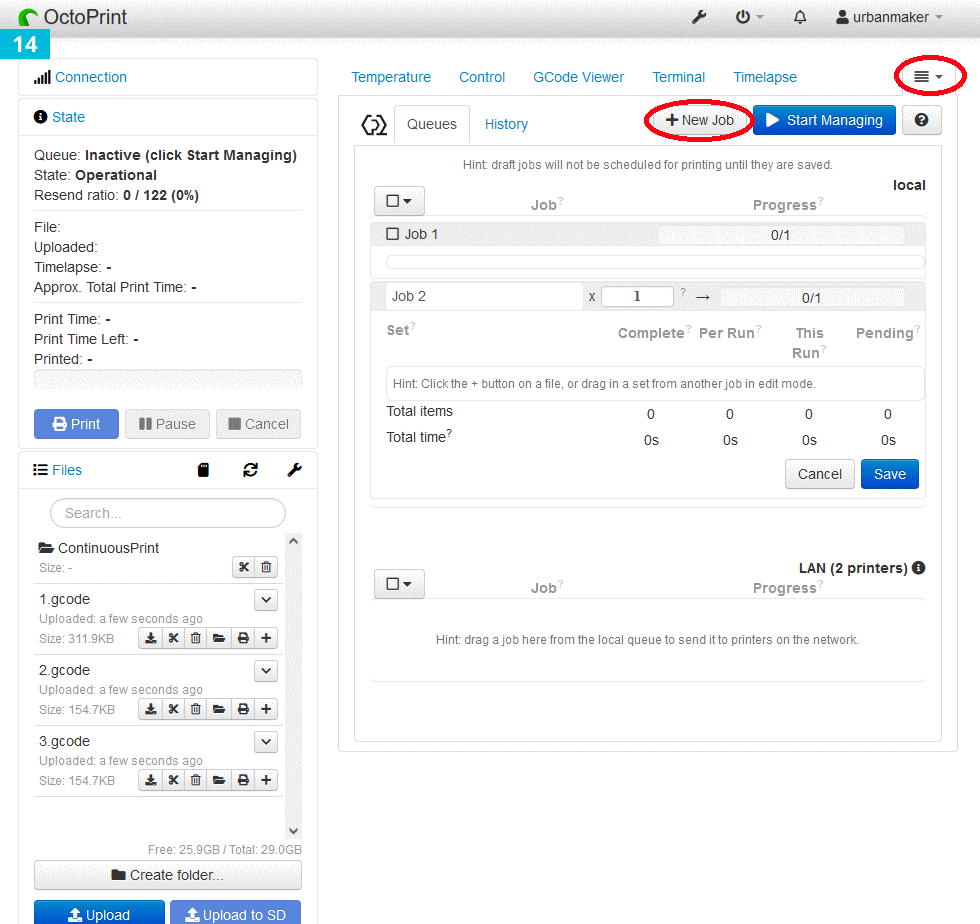
- Click on menu icon of Continuous Print in the upper right area and press „+ New Job“
- Add your GCODES using „+“ and confirm by pressing „Save“. To start the queue press „Start Managing“.
- Please note, all GCODES in the queue must be created using a JobOx slicer profile. Otherwise loading and ejecting Puild Plate will not work.






Karmen 3D (hardware based / free)
Karmen3D is a third party service developed and provided by Fragaria. To oppearte with MK3/MK4 it requires an additional hardware like Karmen Pill (plug-and-play solutions) or a regular Raspberry Pi with preinstalled Octoprint or Klipper OS. Karmen service is cloud based and allows you managing your printers remotely. Registration and usage is currently free of charge.
Karmen3D: Revolutionizing 3D Printing Management
Karmen is an innovative cloud-based workspace that facilitates the remote control and management of your 3D printers. It boasts a range of advanced features, including automatic fail detection, rendered G-code previews, timelapse videos, and various other functions designed specifically for 3D printers. With Karmen, there's no need for SD cards or offline file transfers - everything can be accessed and controlled online from anywhere.
Key Features:
- Printer control from a single interface: Manage and monitor one or more 3D printers from a single application.
- G-codes management: Cloud storage for print files with the ability to search and sort into folders.
- Live video: Watch your print in progress and stop the printer if something goes wrong.
- Time-lapse: Karmen makes a record of the print for review and sharing with others.
- Teamwork: Share your 3D printers and print files with friends, students and colleagues.
- Upload G-codes from any slicer: Send print jobs from your slicer (Slic3r, PrusaSlicer, Cura) straight to Karmen.
- History: Keep track of who printed what and when.
- Automatic Error Detection: Karmen features artificial intelligence that diligently monitors the printing process via webcam.
- G-code previews: This function enables you to find the correct print job and preview the final print, identifying errors like missing support structures.
The Karmen service is currently free of charge.
Once your account and workspace are set up in the Karmen cloud application, the next step is to connect your 3D printer. Whether you have one, two, or more, it's entirely up to you.
How to Connect Your Printer:
- Karmen Pill (ready plug-and-play solutions)
- Octoprint plugin
- Klipper plugin
Karmen enables you to queue and run G-codes in a print queue. If you have a JobOx bed-exchange system, the entire process becomes a breeze. For detailed information, read this documentation and follow a forum.
SimplyPrint (hardware based / subscription with discount for JobOx users)
Simplyprint is a professional server based printer management solution targeted to printing farm, businesses running its own production and also to hobby/enthusiast users who would like to enhance their workflow. It brings a lot of functionality to your printers including remote connectivity, live monitoring, print queue and history, cloud slicer and automation.

To run your Prusa MK3/MK4 printer with SimplyPrint system, you will require a Raspberry Pi to install the software. One Raspberry Pi can be connected to multiple printers.
Simplyprint offers different subscription plans including a free one. However to run an automation feature you will need to choose the "Print Farm" plan (currently $34,99/Month - includes connection of 10 printers ! - cancel any time and 30 day money back guarantee).
SimplyPrint offers JobOx users a discount of 25% on "Print Farm" plan for 4 month.
Discount code: jobox-25
You can find further detail on the SimplyPrint JobOx integration page here:
https://simplyprint.io/compatibility/prusa-i3-mk3s-plus-jobox
A more detailed instruction on how to setup SipmplyPrint in order to run with JobOx will follow shortly. For now you can contact a support team from SimplyPrint to get guidance.
Print & Go (hardware based / subscription)

Print&Go is professional server based printer management solution targeted to businesses running its own production or printing farm. To run your Prusa MK3 printer with Print&Go system, you will require an additional dedicated WiFi capable node hardware which will be provided to you by Print&Go.
- Already a Print&Go user? Fill the form (https://printandgo.tech/contact-us-autoremove/) for requesting the AutoRemove Pack, needed for managing Prusa MK3 + Jobox printers in your Print&Go account.
- You don't have a Print&Go account yet? Request a 30-day free trial here: https://printandgo.tech/contact-us-autoremove/
- Create your printers in the "Printers" page. Create them with the "Prusa MK3 Jobox" model.
- The AutoRemove feature (the automatic triggering of your enqueued files to the printer) is disabled by default. If your printer can activate the Autoremove, you will see a grey infinity icon.
- Go to the Printer's page and activate the AutoRemove checkbox. There, you can modify the "AutoRemove Delay". This is the safety delay, in seconds, between the auto-retiring of the piece and the auto-starting of the next file in the queue
- Once activated, the printer will have a green infinity icon, and the printer will auto-start the next files in the queue.
- Upload files to Print&Go and enjoy a 24/7 production with Print&Go + Jobox!


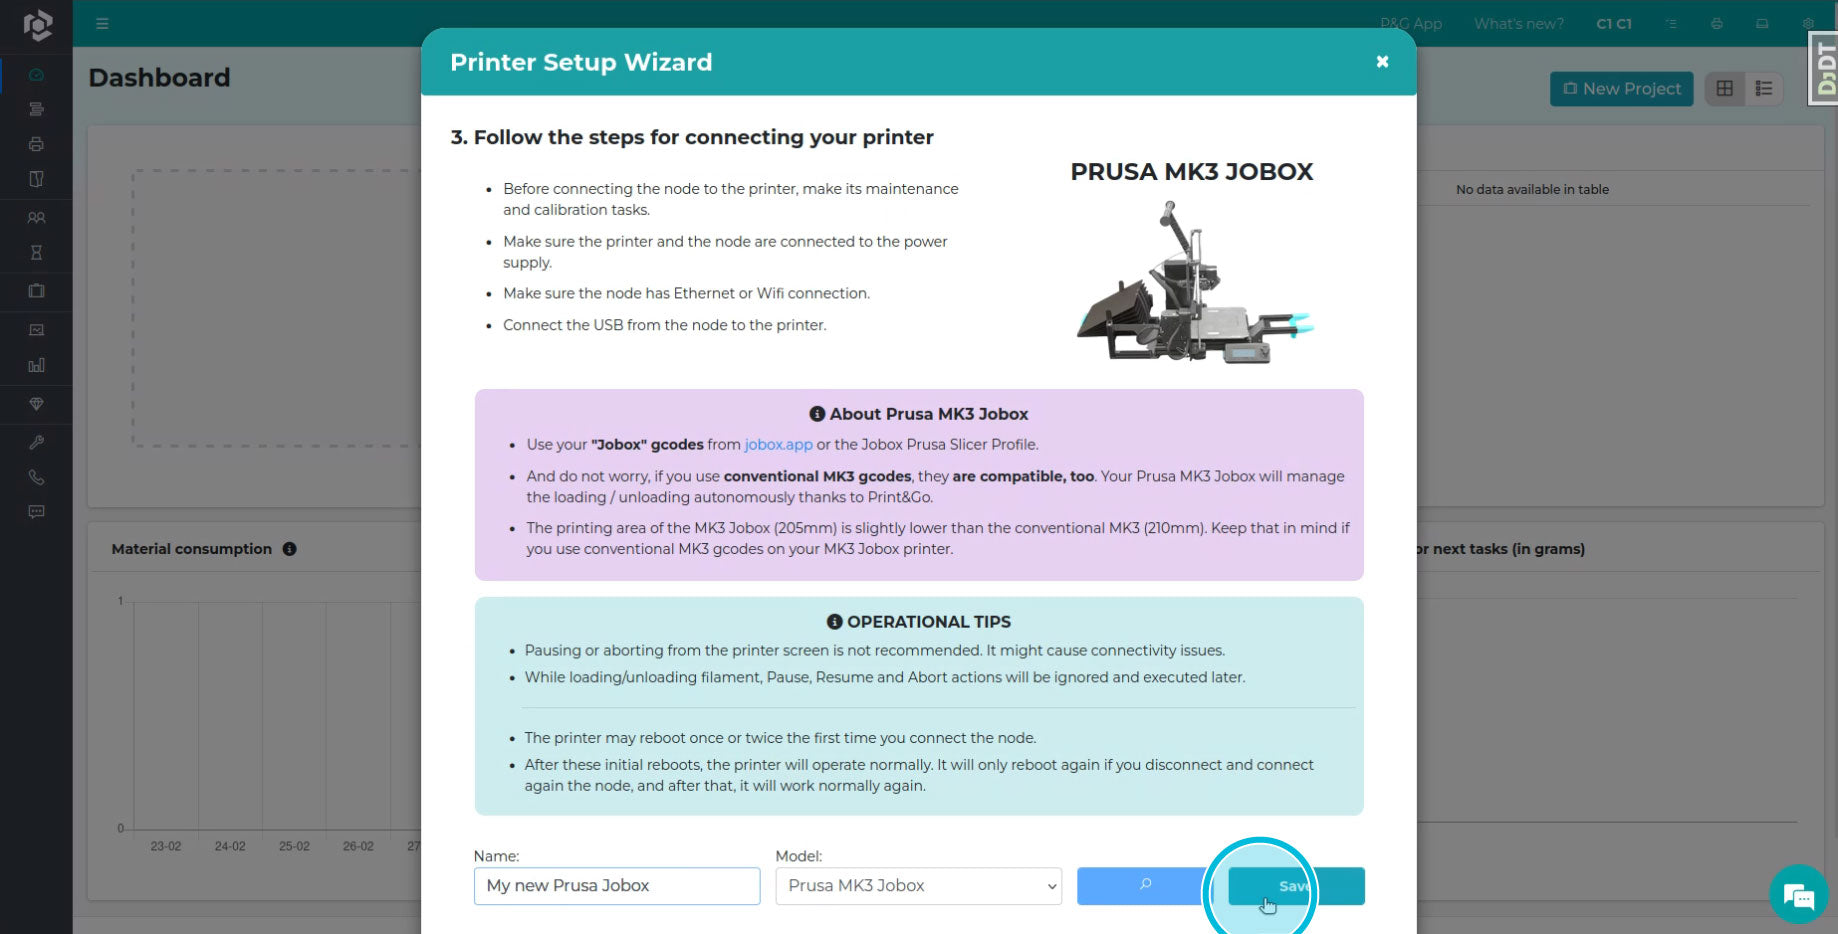


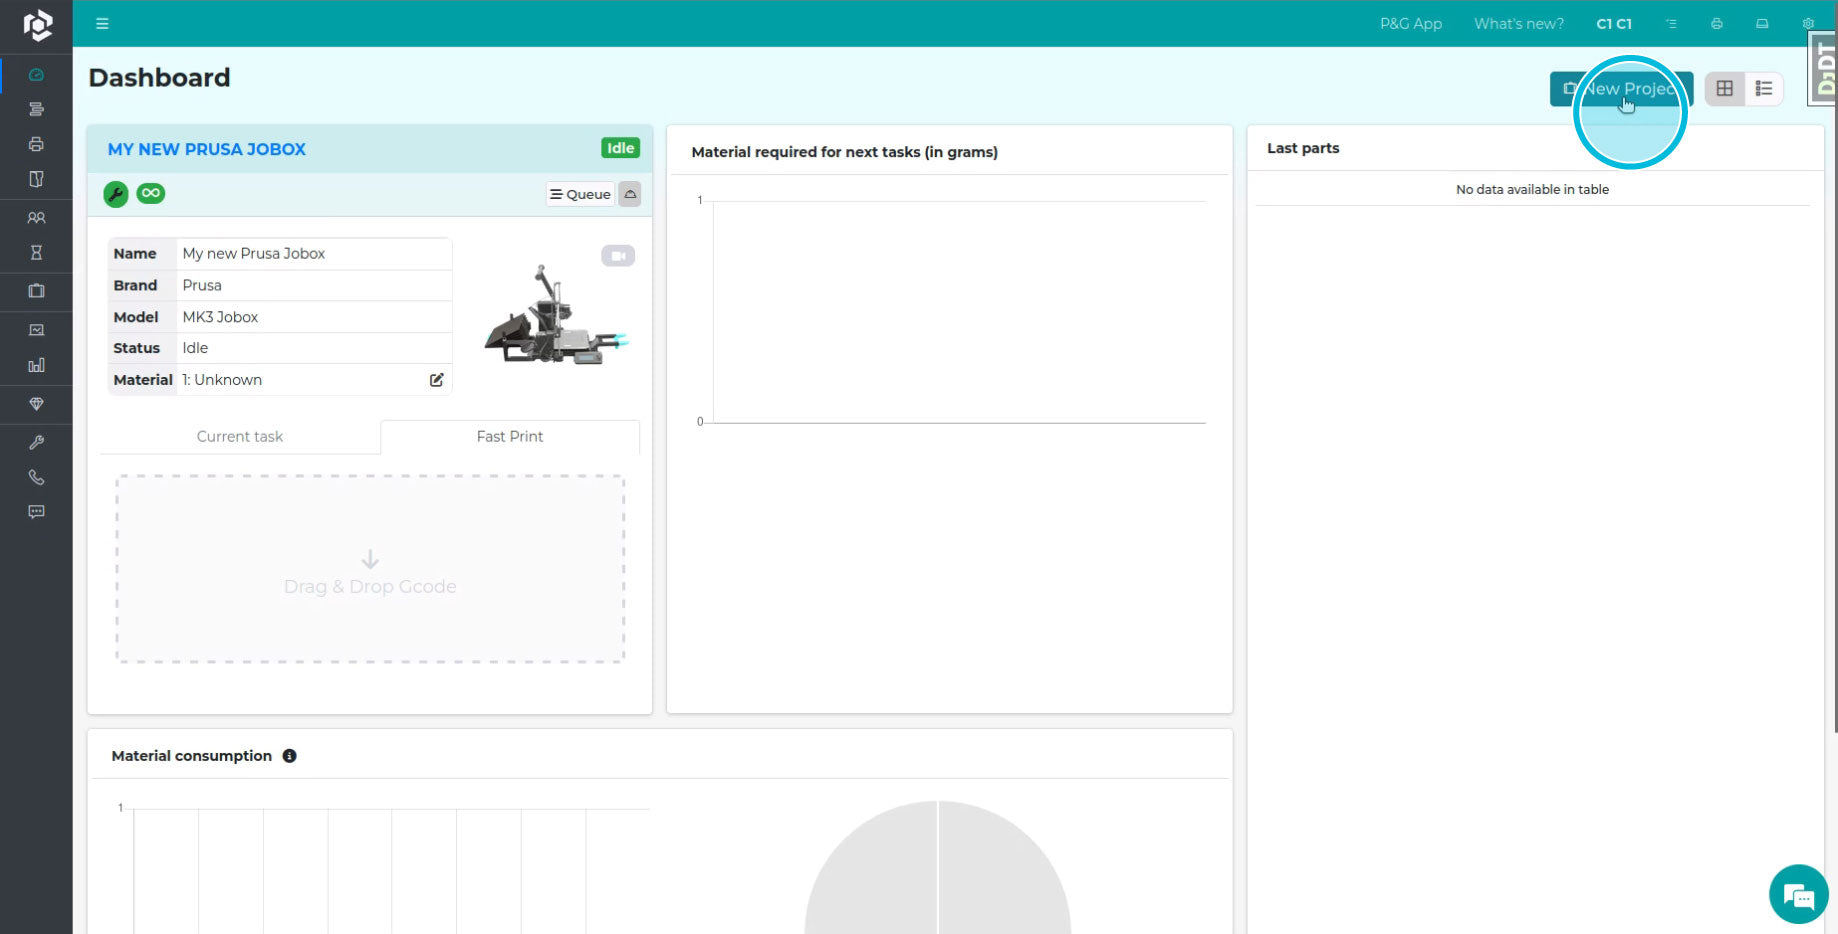

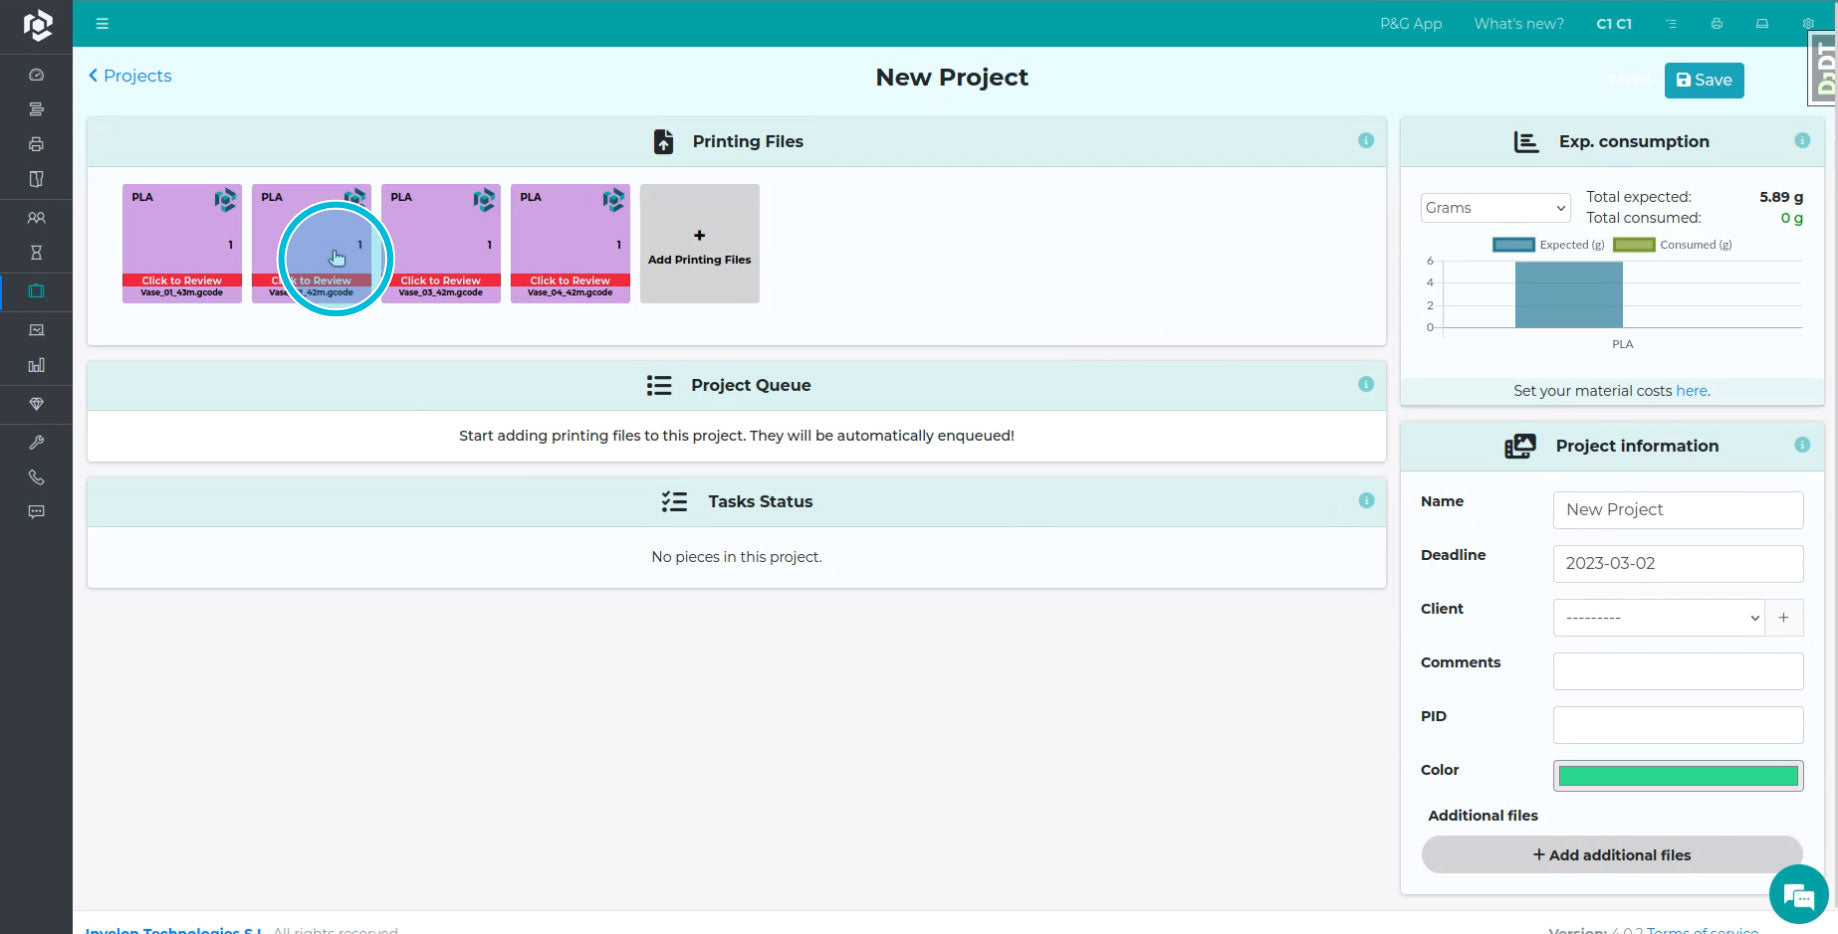
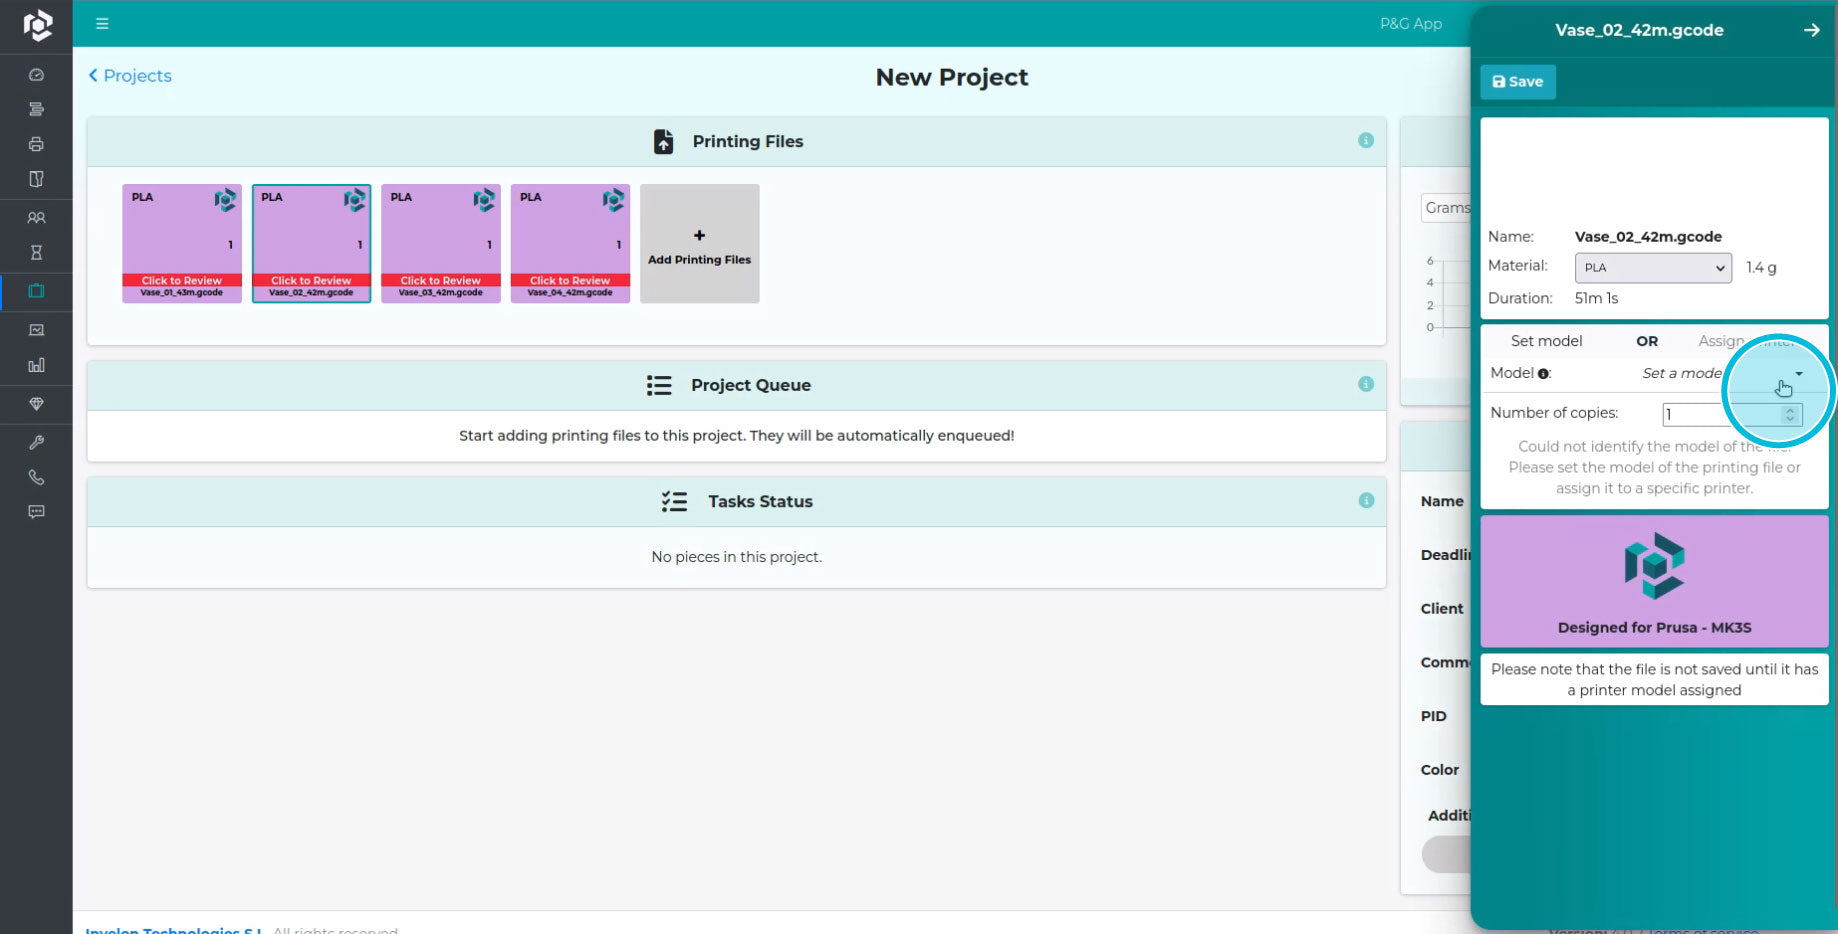


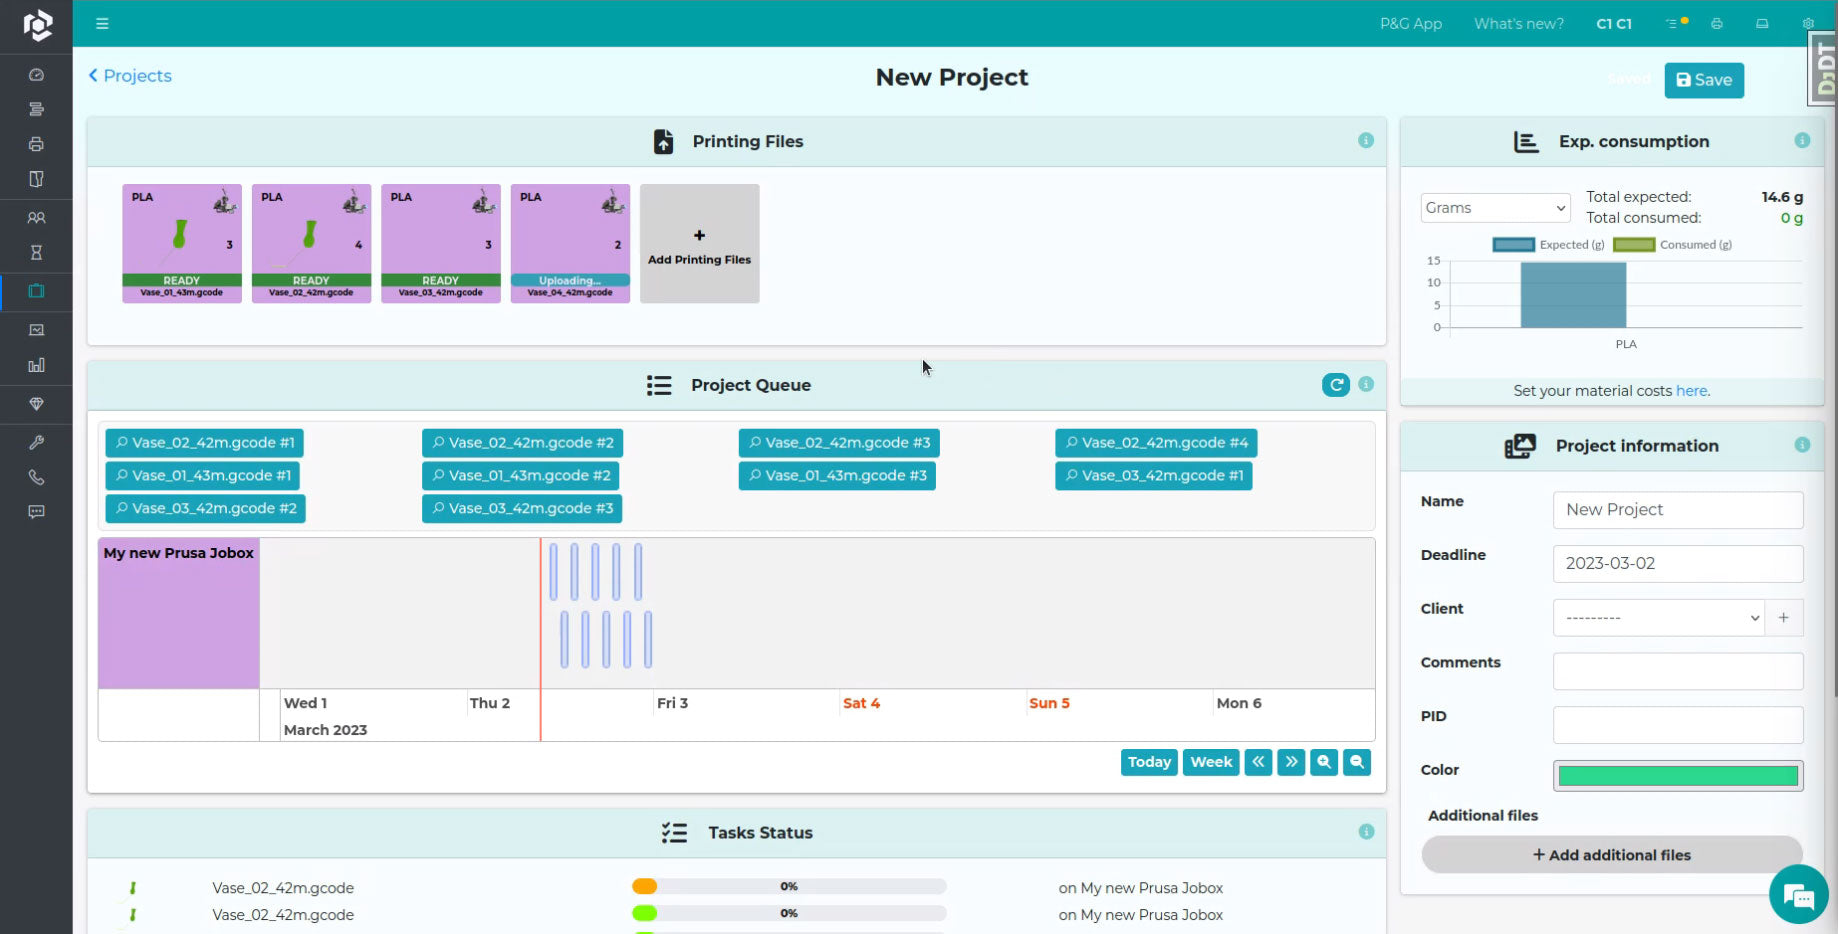
Please note: Thanks to JobOx integration, Print&GO software is able adding the sequence for loading and ejecting to your GCODE files automatically. However, the Print&GO manager is not yet able analyzing the margins of imported files and will accept and process any GCODE, even if it is outside of allowed printing area and is not compatible for using with JobOx. We highly recommend using our dedicated JobOx profiles for your slicer in order to ensure the compatibility of your GCODE file.
Repetier (hardware based / partly free)
Repetier server is a print management software which can be installed on your own hardware. There are versions for Raspberry Pi, Windows, Linux and Mac. Repetier server can be used for two printers for free. To operate with more printers a "light" or "pro" version is needed (one time payment without subscription). Read more here: www.repetier-server.com
Please note: the method provided below is not tested yet! We prepared this rough guidance based on information provided by Repetier in their support forums and user manual (se sources below).
According to Repetier, the only step which is need to be done is sending a corresponding command to the server (perhaps using _console):
@autostartNextJob (if you are using Repetier version 1.2.0 or newer)
@autostart_next_job (if your Repetier version is older than 1.2.0)
Since the loading and ejecting routine for JobOx is already included in your GCODE file (JobOx slice profile is mandatory!) no additional code is needed (neither before nor after a print). After the printing job is finished and the building plate is ejecting the next print job in the queue will be started automatically.
Sources:
https://forum.repetier.com/discussion/8763/sum-grams-of-filament-on-queue-and-other-tricks
https://www.repetier-server.com/manuals/1.2/index.html
(see Advanced Themes > Server Commands)
Implementation API
If you are a developer and would like to implement JobOx system support into your product or your favorite project, please check our API section. Also if you are an enthusiast and would like to introduce how to run JobOx with your favorite system not yet listed here, please don't hesitate to get in touch. We would be glad adding your guidance to this list in order to share it with other users who can benefit from it.
- Choosing a selection results in a full page refresh.
- Opens in a new window.
