Troubleshooting for JobOx on MK3/MK4
Following troubleshooting section is referred to JobOx v1.0 (legacy version) which was shipped before March 2024. If you encounter issues while using current version (JobOx v1.5) please contact our support team.
This troubleshooting guide is divided in two section. In the first sections we listed all known and thinkable failure scenarios following by a list of possible measures which can be taken to solve the certain issue. The measures should be taken in the same order in which these are listed. The last measure is contacting our support, which would possibly take days to be proceeded and should be the last option after you have tried all steps listed before.
In the second part of this troubleshooting guide you will find a detailed description of each possible measure listed in the first section. The chapters here are linked with the lists in the first section, so you can easily jump back and forth by clicking the links in the list and then using the back button of your browser (app) to navigate back to the list of the measures.
In order to helping you narrow down the errors we divided the whole process in multiple phases and named these as following.
Loading procedure fails
Printing process fails
Ejecting process fails
- Lifting the plate fails
- Sliding down fails
- Finishing ejection fails
- Building plate sticks to the anti-slip pads
Other
If you are not sure in which phase your issue occurred or how it happened, please take a look at our detailed setup guidance. You should have already got familiar with it before the first use of JobOx system. Here you will find a test-GCODE which performs all the loading and ejecting phases step by step helping you identifying where the issue possibly occurred.
Section 1: Possible issues
#hooking_fails
Hooking the plate fails
The loading process starts when the heating bed moves towards the magazine where the building bead hooks into a corresponding slit of the aluminum cover. The correct hooking process of the building plate should look like following.

If it doesn’t perform this way in your setup and the mowing heating bead is not able hooking a building plate, please try following steps to resolve the issue:
- The leveling of the JobOx magazine unit is possibly to high. Please follow the detailed magazine unit leveling guidance here. Read more...
- Make sure your JobOx units are assembled correctly and/or no screws have become loose over time. Make also sure that JobOx units are docked properly to your printer. Read more...
- Make sure that your JobOx setup is placed on a flat and even surface. Read more...
- Please note: Leveling should be performed in place where the system will operate and not be moved to another place after its done.
- Make sure that the wiring is not in the way. Read more...
- Check the slots on the heating bed cover. Read more...
- Check the building plates amount in the magazine. Read more...
- Perform the XYZ calibration. Read more...
- Check the hooks of used building plate. (Read more here) If retrofit hooks are used, please read also this chapter.
- If none of the measures and guides listed above have helped to resolve your issue, please contact our support. Please write a code “Error-01” in the subject of your email.
#pulling_fails
Pulling out fails
The correct pulling out process of the building plate should look like following.

If it doesn’t perform this way in your setup and the mowing heating bead is not able pulling out a building plate, please try following steps to resolve the issue:
- Make sure your JobOx units are assembled correctly and/or no screws have become loose over time. Read more...
- The leveling of the JobOx magazine unit is possibly to high. Please follow the detailed magazine unit leveling guidance here. Read more...
- Make sure that your JobOx setup is placed on a flat and even surface. Read more...
- Please note: Leveling should be performed in place where the system will operate and not be moved to another place after its done.
- Check the slots on the heating bed cover. Read more...
- If none of the measures and guides listed above have helped to resolve your issue, please contact our support. Please write a code “Error-02” in the subject of your email.
#snapping_fails
Snapping to magnetic bed fails
When the building plate snaps correctly to the heating bad, the process should look like following.

During this step the hooks of the building plate slides over the edge of the heating bed making the building plate snap to the heating bed. When this step is finished, your building plate should lay entirely flat on the heating bed, hold by magnets. If it doesn’t perform this way in your setup (e.g. if the hooks didn’t slide down entirely), please try following steps to resolve the issue:
- If you are using original Prusa building plates, please make sure the retrofit adapter hooks are mounted on the correct side. Read more...
- Make sure that your JobOx setup is placed on a flat and even surface. Read more...
- This issue can also occur while loading building plates with irregularly high curvature. Read more... Please try using another building plate, to make sure the issue is not caused by a faulty building plate. Consider replacing the building plate if the issue occurs frequently on the same plate.
- Check the position of the linear-bearing of the heating bad. Read more...
- Lift the back feet of the Magazine using underlays. Please read this chapter for detailed instructions.
- If none of the measures and guides listed above have helped to resolve your issue, please contact our support. Please write a code “Error-03” in the subject of your email.
#printing_fails
Printing process fails
Mesh-leveling fails
- Please try using another building plate, to make sure the issue is not caused by a faulty building plate. Consider replacing the building plate if the issue occurs frequently on the same plate.
- If you are using original Prusa building plates, please make sure the retrofit adapter hooks are mounted on the correct side. Read more... Please note, that retrofit adapters are not designed to be used with building plates other than original Prusa plates.
- If none of the measures and guides listed above have helped to resolve your issue, please contact our support. Please write a code “Error-06” in the subject of your email.
Fails caused by accidental ejecting of the building plate
- If this error is appeared during the regular printing process (NOT during the test-run of OX-TEST.GCODE) than, please get sure you are using the JobOx profile on your slicer. Using JobOx slicer profile is an important criteria! Read more...
Please consult also a chapter about malfunctions caused by printing process. Read more... - Make sure that your JobOx setup is placed on a flat and even surface. Read more...
- Perform the XYZ calibration. Read more...
- If you are using original Prusa building plates, please check if the retrofit adapters are in place. Read more...
- If none of the measures and guides listed above have helped to resolve your issue, please contact our support. Please write a code “Error-05a” in the subject of your email.
Fails caused by the insufficient first level adhesion
- Rule out that the issue is not caused by any general reasons, like slicing/printing settings or filament properties/quality.
- When you using the JobOx building plates, please make sure you have adjusted the Z-offset value on your printer, in order to fit the new surface type. Read more...
- Make sure that all building plates in your magazine stack are of the same type. Read the chapter “Different types of the building plates” for more information. Read more...
- Check the surface of your building plate. Read more...
- If the issue accrues always on the same building plate, please consider replacing it.
- If none of the measures and guides listed above have helped to resolve your issue, please contact our support. Please write a code “Error-05b” in the subject of your email.
Fails cause by a collision (e.g. cooling fan shroud)
- Please check the cooling fan shroud. Read more...
- If none of the measure(s) and guide(s) listed above have helped to resolve your issue, please contact our support. Please write a code “Error-05c” in the subject of your email.
#lifting_fails
Lifting the plate fails
When the printing process is finished, the heating bed will move towards the ejecting unit, hook into the movable ramp and lift the building plate. The process should look like following.

If it doesn’t perform this way in your setup (e.g. the plate doesn’t hook into the ejecting unit), please try following steps to resolve the issue:
- Make sure your JobOx units are assembled correctly and/or no screws have become loose over time. Here you can find some most frequently appearing assembling issues. Read more...
- Make sure that your JobOx setup is placed on a flat and even surface. Read more...
- Perform the XYZ calibration. Read more...
- If none of the measures and guides listed above have helped to resolve your issue, please contact our support. Please write a code “Error-07” in the subject of your email.
#sliding_fails
Sliding down fails
Once the building plate is hooked by the ejecting unit, the heating bed will perform series of movements lifting and sliding the building plate down from the heating bed step by step. The process should look like following.

If it doesn’t perform this way in your setup, please try following steps to resolve the issue:
- Check the magnets polarity of the seesaw. Read more...
- Make sure that the issue is NOT caused by building plate sticking to the anti-slip pads (otherwise please continue reading here).
- If you are using original Prusa building plates, please check if both retrofit adapters are in place. Read more...
- If none of the measures and guides listed above have helped to resolve your issue, please contact our support. Please write a code “Error-08” in the subject of your email.
#finishing_fails
Finishing ejection process fails (e.g. plate is jammed by heating bed)
At the very end of the ejecting process the building plate leaves the heating bed entirely. The process should look like following.

If it doesn’t perform this way in your setup (e.g. the building plate falls backwards between the heating bed and ejecting unit), please try following steps to resolve the issue:
- Make sure your JobOx units are assembled correctly and/or no screws have become loose over time. Here you can find some most frequently appearing assembling issues. Read more...
- Make sure that your JobOx setup is placed on a flat and even surface. Read more...
- If none of the measures and guides listed above have helped to resolve your issue, please contact our support. Please write a code “Error-09” in the subject of your email.
#pads_sticks
Building plate sticks to the anti-slip pads
- If you are using original Prusa building plates, the anti-slip pads of the JobOx heating bed cover needs to be removed. Otherwise these will stick to the heating bad, making the ejecting process impossible. Read more... Please check also warning information of the manual leaflet coming with the retrofit adapters.
- If you have experienced this issue while using JobOx building plate, please make sure, that no glue or other adhesive substances are covering the bottom side of the building plate. Please clean the surface if needed.
- If none of the measures and guides listed above have helped to resolve your issue, please contact our support. Please write a code “Error-00” in the subject of your email.
#other_error
Not listed error occurs
- If none of the measures and guides listed above have helped to resolve your issue, please contact our support. Please write a code “Error-00” in the subject of your email.
Section 2: Measures description
In this section you will find several informations, guidances and measures, which can be taken in order to solve one of the certain issues listed in the first section.
#leveling
Leveling of the JobOx magazine
The JobOx magazine can be leveled in order to equalize the height tolerances of your Prusa MK3S printer which can slightly vary depending on the printer version and its assembly.
That's why it's highly necessary perform the leveling of the JobOx magazine before first use. It is not recommended mowing the setup after the leveling of the magazine, so it needs to be done in place where it will operate.
When the JobOx magazine unit is leveled to heigh, the printer will not be able pulling the building plates out of the magazine unit. When the magazine unit is leveled to low, it will probably not cause any significant malfunctions but it could become unnecessary noizy during the printing and cause collision detections, especially when the magazine is loaded with large amount of building plates.
The misalignment can also occur after a certain period of use. Leveling can be repeated later when operation issues occur (eg. printer don’t load new plate from magazine or the printing bad obviously collides with the magazine unit).

- Make sure that that feet of your 3D printer are proper placed into the corresponding slits of the JobOx parts.
- Make sure that wiring of the extruder and heating bead are not in the way.
- Make sure, that JobOx aluminum-cover is removed from the heating bad.
- There should be NO building plate on the heating bead of your 3D printer.
- Make sure that surface where your 3D printer and JobOx are placed, is even and stable.
- To perform the leveling put one JobOx building plate (or Prusa building plate equipped with JobOx retrofit adapters).
- Make sure the screw (I) of the magazine bridge (H) is slightly loose. The magazine bridge should be movable but not wobbling
- Place heating bad (G) underneath the hooks (F).
- Adjust the height of the magazine bridge (H) to make tips of both hooks barely touching the surface of the heating bead.
- Move the heating bad away from the magazine bridge and fasten the screw.
- Now check again if hooks still touching the heating bead to rule out that fastening process haven’t cause any misalignment.
- Repeat the leveling steps 7-11 if necessary
- Place the JobOx aluminum-cover back on the printing bad and fix it with two knurled nuts
- Move the heating bad by hand to check if the hooks of the building plate in the magazine snaps into the slots of the aluminum cover of the heating bad. Execute the ox-test.gcode file if you want to get sure that everything is setup properly.
Please note, when you have leveled your magazine to the lowest possible position, but the hook still can’t touch the heating bead surface, then the frame of the JobOx magazine is probably assembled slightly skew. Try to push the magazine bridge down (by hand) applying a gently force. Also when you notice that only one of both hooks touches the heating bed, then it is most likely that the magazine bridge is tilted on one side. Set it straight, so both hooks become on the same level.
If you using Original Prusa building plate with Jobox retrofit adapters, please make sure, that grub screws, are screwed in as deep as needed. They should not stick out of the holes.
#even_surface
Operating surface
To ensure that your JobOx operate well its highly recommended to install JobOx on a flat and even surface. Uneven surfaces can cause unexpected malfunctions during loading and unloading process. Please find an appropriate place that meets these requirements or use a stiff base plate as underlay. If this is not possible you can also even out the setup manually by using improvised underlay pieces. However, we would not recommend this method and treat this option as a temporary solution.

#misassembling
Possible misassembling and misalignment of JobOx unit
When you have experienced issues in a functionality of your JobOx system, please check if your JobOx unit is properly assembled and there are no misalignments between the single parts and components. Since the JobOx unit is usually distributed as a DIY kit, the risk of such misalignments are quite high. Especially when the issue occurs during the setup process (while the test-run of OX-TEST.GCODE file) or at the beginning of the usage period, incorrect assembly or simply some loose screws are a fairly likely reason. Here is a known (but not conclusive!) list of possible spots to check.


Make sure that frame-feet of your Prusa MK3S printer are properly placed in the corresponding slots of JobOx magazine unit on one side and the ejecting unit on the other side. The docking connection between the JobOx and the printer should be rigid and stiff. The frame of the printer should not have any contact to the ground and be carried entirely by the JobOx. In case when your printer is equipped with rubber feet, these should be removed if they still touching the ground.

#wiring
Wiring
To ensure that your JobOx operate well its strictly necessary to get sure that cables are not in the way. Secure the extruder cable of your Prusa MK3S with the cable clip (included in each JobOx kit). Otherwise there is a risk, that the cable will continuously rub against the building plates inside the magazine, causing the damage of the wires. Also the cable of the heating bad needs to be guided offside of the magazine, so it doesn't come in the way, when plates are pulled out.

#using_underlays
Using underlays
This is quite unlikely that this measures needs to be taken, however when certain functionality of JobOx cannot be restored/induce by other measures, this method can possibly help.
In order to keep the assembly and setup of JobOx unit as easy as possible, we reduced the amount of adjustable parts to a minimum. Only the high of the magazine bridge needs to be adjusted to ensure the proper functionality of JobOx. In almost all use cases it’s enough to ensure the flawless functionality of JobOx system. However, since both JobOx units and Prusa MK3S printers are mostly sold as a DIY kit, it cannot be entirely ruled out, that in some rear cases the certain JobOx unit doesn’t fits with a certain Prusa MK3S printer without some further adjustments.
Some of these adjustments can be possibly achieved by usage of underlays. The quickest and easiest way is using a regular office printer paper sheet (80 g/m²) folded multiple times to achieve a certain thickness. By folding it three times (resulting in 8 layers) you will get an underlay piece of approximately 0.75mm, which is a good value to work with.

If loading process fails because the building plate doesn’t fall and snaps to magnetic heating bed
This troubleshooting setup is intended for the certain case when during the loading process the building plate fails on the very last phase (see Phase 3 in the JobOx test-run) and doesn’t fall down snapping to the magnets of the heating bead. If this occurs and all previous measures recommended in a corresponding troubleshooting list have not helped solving the issue, please do following.


Loose the leveling screw of the magazine and set the magazine bridge in its lowest possible position. Tighten the leveling screw back again. Than lift the both back feet of the JobOx magazine by using the prepared 0.75 mm paper underlays (read above). You will need at least two pieces of paper to lift both sides equally. If necessary, increase the height to 1.5mm and then to 3mm (by folding the paper underlay) until the issue stops occurring. Repeat the test-run each time you have raised the height. Afterwards you will need to perform the leveling of the JobOx magazine unit.
#check_slots
Check slot of the heating bead cover
Keep the heating bad cover clean and free of filament residues. Especially the two elongated slots on the cover should stay free from impurities like tiny pieces of support material or leftovers leaked from the nozzle. The function of these slots is catching the hooks of the JobOx building plates (or retrofit adapters). This gives your Prusa MK3S printer the ability pulling the building plates out of the magazine. If these slots are blocked by impurities, the loading procedure of the building plate can fail.
#plate_types
Different types of the building plates
JobOx system can be used with dedicated JobOx building plates, which comes in three versions: one-sided smooth, one-sided textured and double-sided smooth+textured (legacy).
Furthermore, there is a possibility to use Original Prusa building plates (spring steel sheets). In this case the JobOx retrofit adapters are needed. Third party plates other than Original Prusa building plates are not officially approved for usage with JobOx system and needs to be verified by the user.
It is strictly advised to NOT mix plates of different type in one magazine (for example JobOx textured and Original Prusa textured with JobOx retrofits). This is because of different z-offset value. This value differs depending on used building plate and needs to be set on your printer for each type of building plate surface individually. When the z-offset value don’t set well, the first layer adhesion could fail. That’s why it’s not reasonable using different types of building plates in one magazine. The only exception is the usage of JobOx double-sided building plates. Here you still can use the double-sided plates together with one-sided plates in one magazine as long as the surface of the upper side is the same (e.g. smooth). On the other hand, you should not mix JobOx double-sided plates together in one magazine, when upper side is not the same.
#z_offset
Adjust Z-Offset of your Prusa MK3 printer
Your Prusa printers Z-Offset needs to be calibrated to the certain type of Buliding plates that are loaded into the magazine. It is highly recommended to not mixing different types of buliding plates in one magazine. Please check Prusa knowledge base for to learn how you can adjust the z-Ofset on your printer. Read more…
Tipp: You can setup a Steel sheet profiles for Jobox Building Plate on your Prusa Printer to be able switching the Z-offset setting more comfortable. Read more…
#retrofits
Retrofit adapters
Original Prusa building plates (spring steel sheets) needs to be equipped with Jobox retrofit adapters in order to be used within the JobOx automation system.
Please note, that retrofit adapters needs to be mounted on the place specified in the assembly guidance. Mounting the adapters on the wrong edge or on the wrong place, will probably case unexpected malfunctions, like loading and ejecting failures.

Also make sure, that grub screws used to tighten the retrofit adapters are screwed properly. They should be screwed in as deep that they at least not stick out of the holes anymore.
Attention! The anti-slip pads of the JobOx aluminum heating bed cover needs to be removed, when using original Prusa building plates. Otherwise these will stick to the heating bad, making the ejecting process impossible. Please check also warning information of the manual leaflet coming with the retrofit adapters.

Please note, that plates of different type cannot be used in one magazine stack, because of different z-offset value. Read also “Different types of the building plates” chapter.
Please check the retrofit adapter in a period of 10 cycles (of the building plate) especially at the beginning of use and when you print with high temperatures of the heating bead (> 50 C°). The plastic part of the hook can deform and the screws can become loosen. This can make the hook losing the grip to the building plate and starting slide down causing issues during the printing (e.g. accidental ejecting of the building plate).
Third party plates (other than Original Prusa building plates) are not approved for usage with JobOx system and their compatibility needs to be verified by the user. Please note, that some third party building plates for Prusa MK3, even these of the same shape as the origianl one, still has different magnetic properties (e.g. in case of “King” building plates). When a plate sticks too strong to the magnets of the heating bed, the ejecting process of the JobOx system will probably fail.
#curved_plates
Curved building plates
Sometimes it happens, that building plates which are made of spring steel sheets become uneven and curved in it surface. This can occur directly after the production or after some period of use (especially when using on a high temperature). This is true for almost all manufacturers and types of coatings (more or less). In a regular use of a spring sheet this curvature is not an issue, because the magnetic force flattens it anyway when it’s placed on the heating bad. But when using such strongly curved building plate within the JobOx system it can cause malfunctions during the loading procedure. If you notice, that a single building plate has a suspicious curved shape and cause repeatedly malfunction in the loading or ejecting process, then conceder replacing this building plate.
#hooks
Building plate hooks
Both type of hooks - the retrofit and the regular hooks are made of a durable polyamide plastic which we expect to perform for a long period of use. However, these parts can possibly wear out one day. You can probably notice it by a heavily abraded tip of the hook. Especially when frequently using the “Jobox 204” slicer profile, this wear could happen more likely. The result may be the malfunction during the loading process of the building plate, when it fails to hook into the slots of the heating bad cover. If this abrasion happens more or less evenly on all hooks, then there is a possibility to relevel the magazine so that even the most abraded hook can reach heating bad. The alternative would be replacing the abraded hooks.
#plates_amount
Amount of the building plates in the magazine
Theoretically the magazine unit can be loaded with as many building plates as physically fits inside (which is more than 20). However, to ensure a reliable functionality of the JobOx system, we recommend to operate with smaller amounts.
The recommended maximum amount is based on the total weight of the stack and also weight distribution. This results in the recommended amount of 8 building plates. The only exception is original Prusa smooth PEI double-sided steel sheet which is slightly heavier and would result in amount of 6 plates. Furthermore, when using a smooth PEI surface (regardless whether original Prusa or JobOx building plates) we recommend using even less amount of building plates. This is because while sliding out the sensitive PEI surface can be scratched by the hooks of the upper building plate, when standing under a heavy load.
We are still collecting “real-world feedback” from our users and the maximum weight recommendation may be increased in the future.
Nevertheless, when loading the magazine with the weight of more than one kilogram we advise using the “JobOx 189” profile for your slicer. Please read our guidance about the slicer setup for detailed information.
#handling_plates
Handling and cleaning the building plates
To ensure that you printed object sticks properly to the building plate, it’s need to be clean. Especially the grease stains caused by fingers can cause issues. Because the ejected building plates need to be loaded into the magazine manually, it’s very important to make sure you are hold the plates on its edges or non-printable areas and not touching the building surface. Please clean the building plates according to the manufacturer guidance.
JobOx building plates can be cleaned with alcohol or isopropanol. Do NOT use acetone to clean the textured surface of JobOx building plates. This will damage the coating.
#shifting_bearing
Shifting the linear-bearing of the heating bad
In a very rear cases it is necessary adjusting one linear-bearing underneath the printing bead. When the Prusa MK3S is assembled, there is a certain tolerance in the position of this linear-bearing. In some unfavorable cases this tolerance can cause the failure when the printer tries hooking the building plate and pulling it out of the JobOx magazine.
This is a very quick hardware adjustment made in one minute but followed by an automated recalibration process which takes around 15 minutes.
You will need a 2.5mm hex key and needle nose pliers (or an open-end wrench of 5.5mm).
- Turn off the printer
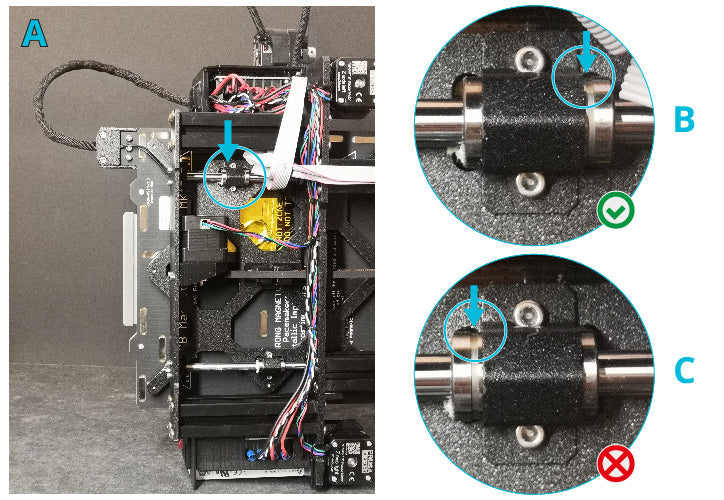
- Turn the printer to the side (power supply towards the ground) so you can easily access the bottom of the heating bad (picture A)
- Move the heating bad, so you have access and free view on the bearing which is closest to the heating bed cable
- Before you continue, check the position of this bearing. If it’s shifted to the right (like detail picture B) than it is already in a most optimal position for operation with JobOx and you can exclude this point as a possible reason for you malfunction. You can proceed with the next advice on your troubleshooting list. In any other case, when it’s in the middle or far left position (eg. like detail picture C), the linear bearing should be adjusted, so please continue following this guide.

- Using the hex key loose the upper screw, which holds the bearing clip (picture D). You will probably need to hold the nut on the other side (by using needle nose pliers or an open-end wrench). In case when your Prusa printer is an older version, eg. MK3S (not MK3S+), then your bearing clips might look differently (like a bow) and you will need to turn the nut from the backside.
- After loosen the bearing clip a little bit, make sure that the linear bearing can now be mowed inside the cutout. Push it to the far right position (picture E).
- Now fasten the bearing clip back again and turn your printer back into its initial position (picture F).
After this modification you need to run the XYZ calibration on your printer (read next chapter)
#xyz_calibration
XYZ calibration of the printer
Important: before starting the XYZ calibration on your printer, the JobOx aluminum heating bed cover needs to be removed.
Now go to Settings -> Live adjust Z. Display will show your current z-offset value. Please note this number (eg. on a piece of paper or just make a photo).
This calibration is fully automated but will take around 20 minutes. If you need some guidance to perform this calibration, please follow here.
After the XYZ calibration is finished navigate again to Settings -> Live adjust Z and set the value to the number you have noted before.
Now install the JobOx aluminum heating bed cover back on your printer (also dock the JobOx units to your printer if they were undocked before) and perform the testrun to check if the issue you have experienced before was solved.
#lost_steps
Malfunction caused by printing process
Lost steps during the printing process could lead to unexpected malfunctions of JobOx system as well. The issue of lost steps should actually NOT happen when the “Colision detection” is turned ON as advised in our setup guidance (read also "Importance of Collision detection" chapter). However, when regardless the active collision detection your Prusa MK3S have lost steps during printing (for some reason) you will probably notice it in shape of layer shifts in your printed object. Also when the collision was to heavy there is also a tiny chance, that the building plate itself become shifted. This will also result in visible layer shifts on your printed object. Such shifts (regardless their actual source) can result in an accidental ejection of building plate during the printing process. So when you find your JobOx setup with a building plate partly pulled from the printers heating bad (maybe accompanied by a printing mess like “spaghetti”), please take a look at the printed object. If there is a layer shift (especially in the Y axis) than the malfunction was most likely caused by this shift and the reasons of it occurrence should be investigated.
If you used the Jobox 204 profile for your slicer you can additionally try slicing with the Jobox 189 profile instead. More information about differences and advantages of these JobOx profile can be found in our slicer setup section.
Also decreasing the count of building plates in the magazine can resolve the issue.
#collision_detection
Importance of collision detection
The functionality of JobOx system is GCODE based and entirely passive. The JobOx process relies entirely on Prusa MK3S sensors and actuators.
That’s why it is strictly necessary turning ON “Collision detection” and DO NOT use the “Stealth mode” on your Prusa MK3S printer. So before operating with JobOx, please open the configuration menu of your Prusa MK3 printer and make sure that the “Collision detection” is turned ON and the “Stealth mode” is turned OFF (means set to normal mode). This is very important step which should prevent your 3D Printer from getting damaged by accident. We tested the Jobox system running thousands of cycles optimizing uncountable technical details of hardware and software. However, as already mentioned, it is a 100% passive machine and we can’t rule out that malfunction will occur. Collision detection (or Crash detection) of your Prusa 3D Printer is the best way to minimize the harm of such accidents and should not be disregarded. Here you can read how to set the Crash detection (ON) and the Stealth mode (OFF) settings.
#slicer_profile
Using correct slicer profile
We prepared dedicated printer profiles for Prusa slicer (or Super slicer) and Cura slicer. Furthermore, we published a guidance on how to setup a printer profile manually for other slicers. Using these profiles for slicing is strictly important to ensure the proper functionality of the JobOx system. More information about these JobOx profile and reasons for its importance can be found in our slicer setup section.
#magnets_polarity
Magnets polarity
The “seesaw” is an only mechanically movable part of the JobOx ejecting unit. It lifts the building plate during the ejection process. It’s equipped with two opposite each other mounted magnets. In a regular setup the magnets are turned in the way, that their polarity pushes them apart, resulting in some kind of spring mechanics making the seesaw part swinging back when pushed (see video sequence below).

In a very unlikely (but possible case) the magnets could have been turned wrong way around during manufacturing process (resulting in the attracting force). Please check this and turn one of the magnets if necessary so the movable seesaw part can swing back like shown above.
#fan_shroud
Cooling fan shroud
If you have experienced collision between the JobOx hooks and the cooling fan shroud, please make sure the fan shroud is not deformed or shifted in an irregular way. The default cooling fan shroud setup of Prusa MK3/ MK3S/ MK3S+ is usually mounted few millimeters about the nozzle level and don’t cause any collisions with JobOx related parts.

If you are using a custom fan shroud, please take measures to adjust its height in order to be able using JobOx system.