Setup JobOx 1.0 (legacy) on Prusa MK4
IMPORTANT INFORMATION: One of the core features allowing MK3 printers operating with JobOx system relatively safely is "collision detection". When collision was detected, Prusa MK3 just re-calibrate the X and Y position and continue printing. This ensures that build plate swap don't occur accidentally. Todays firmware of MK4 do NOT offer a collision detection feature. We hope this functionality will be implemented soon. But for now we just want point out our WARNING, that using JobOx system on any printer without collision detection, can possibly cause serious damage of the printer.
Due to a high demand we received from our community, we decided to release the JobOx Adapter Kit for MK4 anyway. Nevertheless we cannot stress this point enough: as long as the "collision detection" is not working on MK4, the implementation of JobOx on MK4 is experimental (!) and as a user you should beware of the risks mentioned above before start running MK4 printer with JobOx.
Please note, that in order to operate JobOx on Prusa MK4 the printing area will be reduced by the slicer profile to 185mm in the Y direction. So the max. building space will be 250x185x220 mm. Once the collision detection is implemented into the MK4 firmware the building space of JobOx profile could be possibly increased to up to 204mm in the Y direction (similar to the current MK3 profile).
What exactly can happen when using JobOx on a printer without collision detection? [...]
When collision occurs the stepper motors loses steps. The printer don't know where the nozzle is located anymore. Prusa MK3 has a collision detection which monitors the lost steps and home the axis (mostly X or Y) when it occurs to find its actual position in the 3D space again and continue printing or stop it if the problem occurs multiple times in a raw. When collision detection is not there the result of lost steps usually looks mostly as a layer shift in a printed object or "spaghetti mess". In the case of JobOx it's a little bit more dramatic - at least in case of lost steps in the Y axis. JobOx uses Y axis for loading and ejecting build plates. The slicer profile for JobOx reduces the available printing area, so some regions on the Y axis are reserved for loading and ejecting moves. So in regular printing process heatbed doesn't move in this area until the print is done and the build plate needs to be swapped. When the Y axis lose it's steps during printing two failure scenario can occur.
- The heat bed comes into the ejecting area during the printing. The build plate will hook into the Ejecting unit and become lifted and pooled each time the het bed is moving. This will possibly damage the hotend, the part-cooling fan and other parts of the extruder. Also the build plate can become scratched.
- The opposite issue can occur - heat bed can't reach the Ejecting unit because of the lost steps during the printing. This might cause the printer performing the ejectiong moves, without ejecting the build plate. However for this particular failure we already found a workaround by homing the Y-axis each time before the ejecting starts.
Before you start
If your JobOx Magazine unit was delivered without the reinforcement part for cross-connection (revision before May 2023), please download this part on printables.com and install on your JobOx Magazine unit before installing the MK4 Adapter Kit:
Download "Cross-connection Reinforcer" on Printables.com

About JobOx MK4 Adapter Kit
JobOx automation system was initially designed for use with Prusa MK3s printers. To make the JobOx system compatible with Prusa MK4 printers we developed an easy to install Adapter Kit.
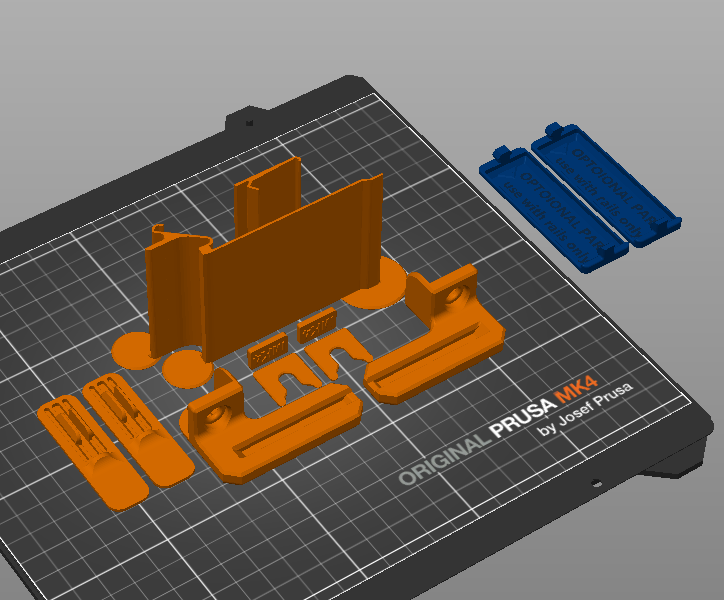
Download "JobOx MK4 Adapter Kit" on Printables.com.
All parts can be printed without support in about 2-3 hours. Some parts contains pre-constructed brim for better adhesion to print bed. These can be easily removed after printing. PETG/PLA usage is recommended.
Please follow the assembling guidance.
Please note:
- This Adapter Kit is not yet tested on printers upgraded to MK3.5/MK3.9.
- Some parts of the JobOx you will see on the images below might differ from the JobOx units you own. Working on improvements we keep JobOx under continuous development. However, all adapter parts are backwards compatible back to the very first official release (eg. provided to our KICKSTARTER backers).
Step 1: Modification of the Ejecting unit
Also the Ejecting unit needs to be lifted up a bit. Since this can't be done as easy as on the Magazine unit, we designed some adapters which can applied to each part individually.

MK4 adapter kit contains two optional parts which are only needed when extension rails are attached to the ejectiong unit. Such extension rails can be made using a regular 20 x 20 mm aluminum slot profile (preferably B-Type).

Step 2: Modification of the Magazine unit

Because the position of Prusa MK4 printers heat bed is slightly higher than on MK3s the magazine side parts needs to be lifted up a bit. To achieve this some small spacer pieces needs to be placed on both sides of the magazine like shown above (steps 1-6). Loosen the screws, place a spacers in-between and tighten it again.
The original magazine feet (which were initially designed for MK3) needs to be replaced by the feet provided in the MK4 adapter Kit(step 7-9). New feet will move the magazine slightly closer to the printer.
After the assembling is done, please continue with the step 12 in your printed JobOx Assembling Guide or this PDF. Please note, that on MK4 the rubber feet do NOT need to be removed!
Tip: if you experience issues with leveling of Magazine unit, please read this more detailed instruction (link).
Step 3: Run the test G-code file
This self-test will make your MK4 Printer performing a dry-run making sure that everything is assembled correctly and ready for your printing jobs.
To perform this test, your JobOx should be assembled, docked to your Prusa printer, magazine should be properly leveled and one build plate needs to be loaded into it. Keep the rest of your build plates ready - these will be needed as well. If all this steps are done let's test it with the following ox-test.
- Download the file JobOx_self-test_MK4.gcode (use right mouse > save link as).
- Copy this test-file to the USB flash drive.
- Insert the USB flash drive into your Prusa MK4 printer and run the test-file.
Your printer will now perform the load and unload routine. This will be done step by step going through multiple phases. The screen of your MK4 will show a short information each time before starting the next phase. Please be patient, especially during the first 9 phases of the test-run. As the system runs for the first time, unexpected behavior can happen. Hold your finger next to the reset button in order to be able to intervene if needed. This will prevent your printer from been accidentally damaged in case of a possible crash. The screen will show a countdown before starting each movement-phase so you have enough time to be prepared.
After the first plate in the magazine was successfully loaded load all you build plates into the magazine. You printer will perform multiple loading and ejecting sequences so you will probably need refill the magazine using already ejected plates.
The behavior you will observe will be like shown below but slower and with multiple interruptions.

If something don't work like expected, please consult this instruction (link). There you will find a detailed description of what should happen in each phase and links to a corresponding troubleshooting section if something don't work. Please note, this section is built for an MK3 printers and some details might not be applicable to MK4.
Step 4: Setup slicer profile
When using Prusa MK4 printer with the JobOx system you will need to download a dedicated profile for you slicer and add it to your presets. For now we only offer a profile for Prusa Slicer (version 2.6 and newer).
- Download Prusa-slicer-profile_MK4_JobOx_v01-04.ini
- Open Prusa Slicer (version 2.6 and newer)
- Go to File > Import configuration collection
- Navigate to ini-file downloaded in step 1
- Confirm popup
- Now you can select the "JobOx MK4IS 0.4 185mm (v...)" profile in your printer list dropdown
The 185mm in the profile name stands for 185mm building space in the Y direction. The space is limited because JobOx uses some area on the Y axis to initiate the loading and ejecting procedures. We expect to increase the available building volume once the collision detection is implemented in the MK4 firmware.
Please note: our profile is built on the base of Prusa MK4 0.4 nozzle default printer profile. We adjusted the building space dimensions and added the JobOx sequences for loading and ejecting of the build plates as a START- and END-GCODE. Also the thumbnail preview function is disabled due to technical reasons. Other then that we left all other settings as default.
Step 5: Automation
This section will explain how to setup an automated continuous printing on JobOx for Prusa MK4.
There are few different ways how to setup and run an automation process on a JobOx system. Some of them are entirely software based, other requires additional hardware.
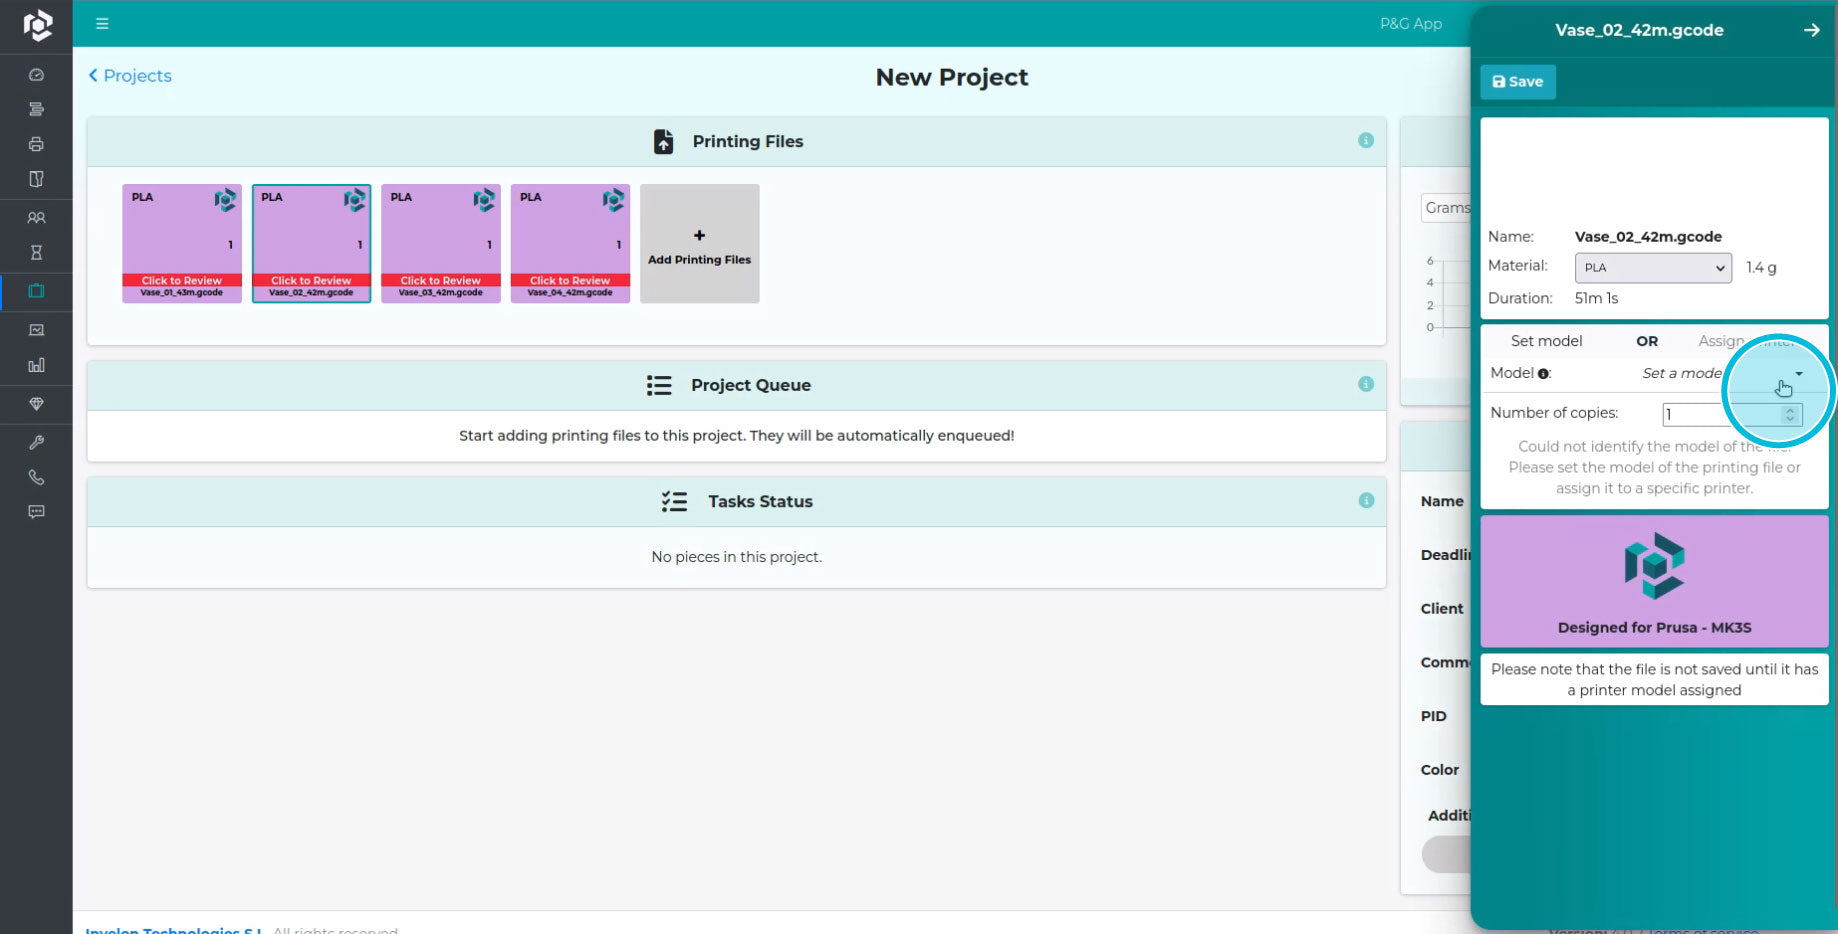
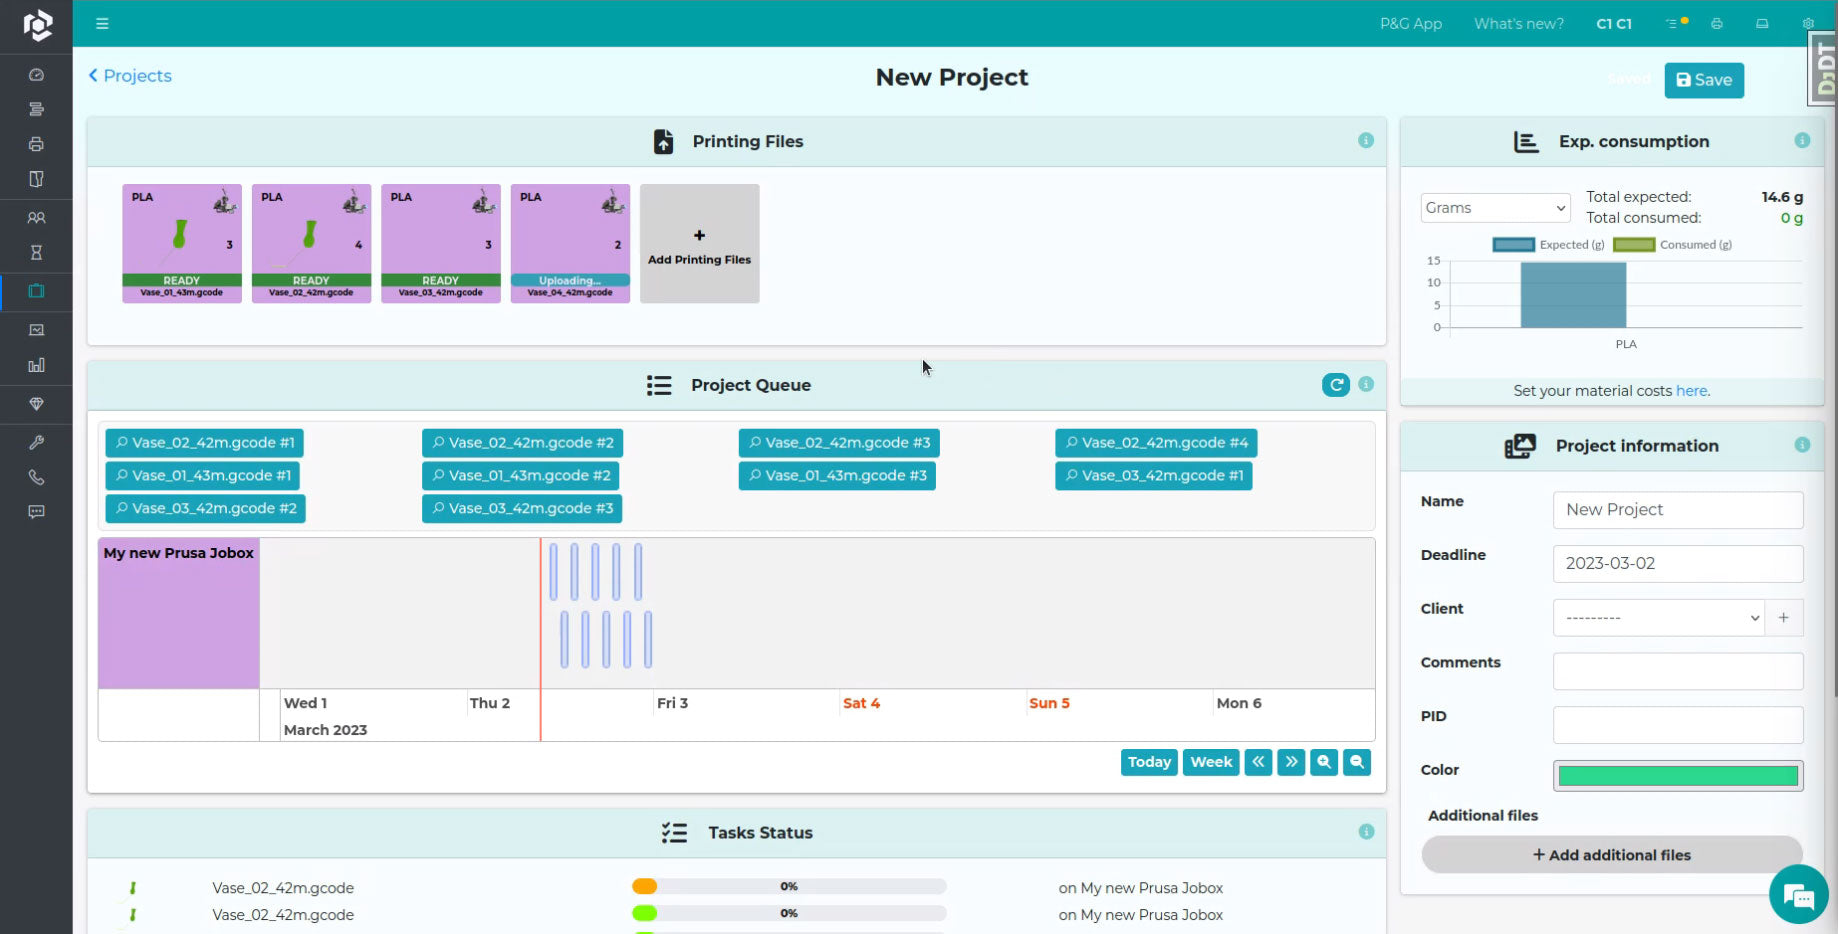
The simplest way starting with automation process is by using our inhouse browser based application jobox.app which works online and offline. This method is entirely software based and no additional hardware is needed.
All other methods requires additional third party hardware, software or service. Each of them has it strength and weaknesses compared to jobox.app and the choice of a best suitable solution should be met individually based on a certain use case. We are introducing these methods as possible options, however we are not affiliated with any of these service providers or product retailers.
Collapsible content
Jobox.app (software based / free / open source)
Jobox.app is a browser based application which takes multiple GCODE files and merge them together into one single file. The operation is very simple.
- Navigate to jobox.app
- Click on “Choose File” and select one of your GCODE files
- You can increase the “Repeats” number to print one GCODE multiple times
- If you need some more files, you can add more lines to the list by clicking on “+ Add file”
- Lines can be sorted by drag-n-drop…
- and removed using the button on the right.
- You will notice that each line indicates the size of the loaded file …
- There is a scale underneath the list, showing the estimated size of the combined file. It needs to be kept in mind, because the total file size should not exceed 450 MB. Bigger files cannot be loaded by Prusa MK3s.
- Enter a name for your compilation file (if empty an automatic name will be generated).
- Clicking on “Merge files” will combine the files into a one single output file and start the download. The output file can be found in the download directory of your browser.

Using on MK4 with Firmware 5.1+
We got some reports from our users claiming that their MK4 just stops printing on random places when printing with GCODE exported by jobox.app. Our online research showed, that this seems to be a global issue which occurs randomly when printing with classic GCODE. However, this bug seems not affecting BGCODE. We hope this issue will be fixed in the next firmware update from Prusa. For now we can recommend two possible workarounds:
- Downgrade to Firmware 5.0 (maybe 4.9 when issue remains). This is the last firmware not showing this issue.
- Unfortunately jobox.app can not process BGCODE files. But you can use a built-in converter of your Prusa Slicer to overcome this. After merging you regular GCODEs in jobox.app just return to your Prusa Slicer, and click on "File > Convert > Convert ASCII G-code to binary > select your merged GCODE file". This will generate a BGCODE file and save it in the same directory as your GCODE. This BGCODE should work flawlessly and also the size will be significantly reduced.
Data security and privacy
We care about your data security and privacy and that’s why the jobox.app is designed in a way, that your files never leave your computer and are processed locally (on your computer by a technique called JavaScript), even if the user interface runs in a browser.
By the way, you don’t even need internet connection for using jobox.app. You can save it locally and use offline.
Learn how ...
- Navigate to jobox.app
- Right click somewhere on the white space to open a website menu
- Click on “Save as” or “Save page as”
- Select the place where the page should be saved,
- Make sure to select “HTML only” as a “File type” option and click “Save”.
- Now instead navigating to www.jobox.app you can just double-click on this file and using the full functionality offline.
Octoprint (hardware based / free / open source)
OctoPrint is an open source 3D printer controller application, which provides a web interface for the connected printers. It displays printers' status and key parameters and allows user to schedule prints and remotely control the printer. The main advantage of OctoPrint is its ability to operate remotely and there is a huge amount of different plugins like "Continuous Print" introduced in this section. However to run OctoPrint additional hardware is required. In most cases a Raspberry Pi is used but there are also few alternatives. This guidance will only explain how to use JobOx with an existing OctoPrint setup and is aimed at users who already familiar with this system. If you are interested in learn more about OctoPrint in general, please visit octoprint.org.
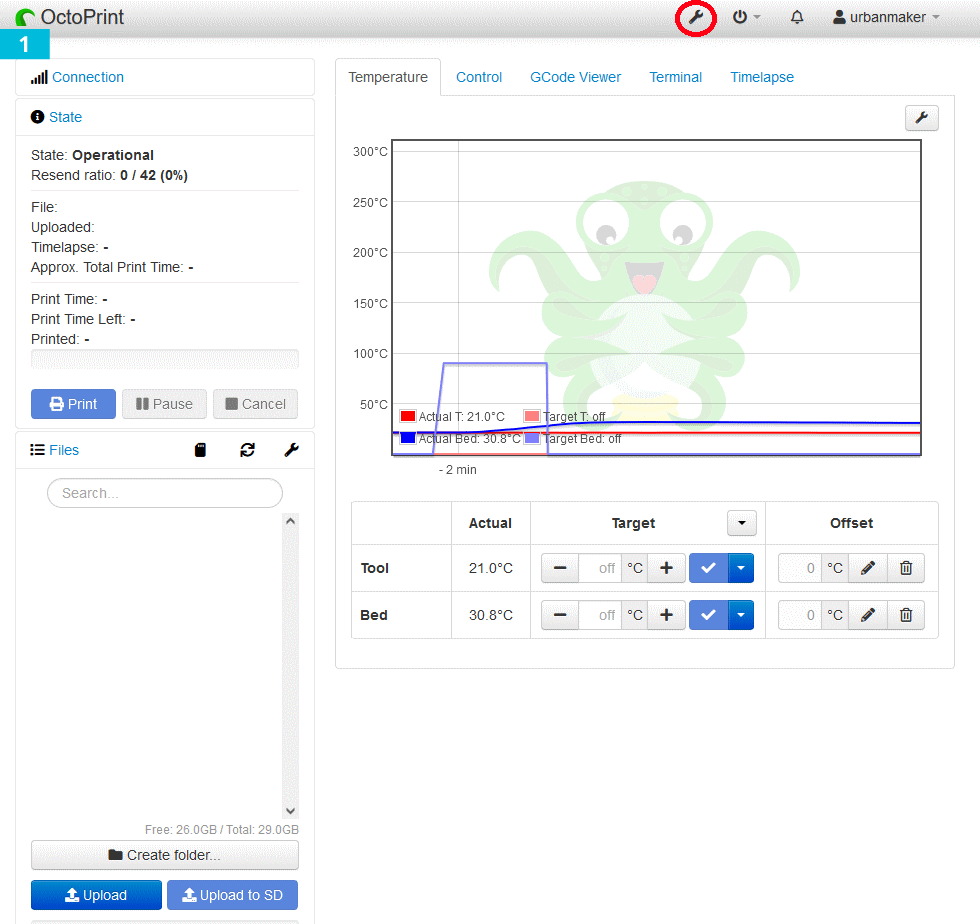
- Click on the wrench icon in the upper right
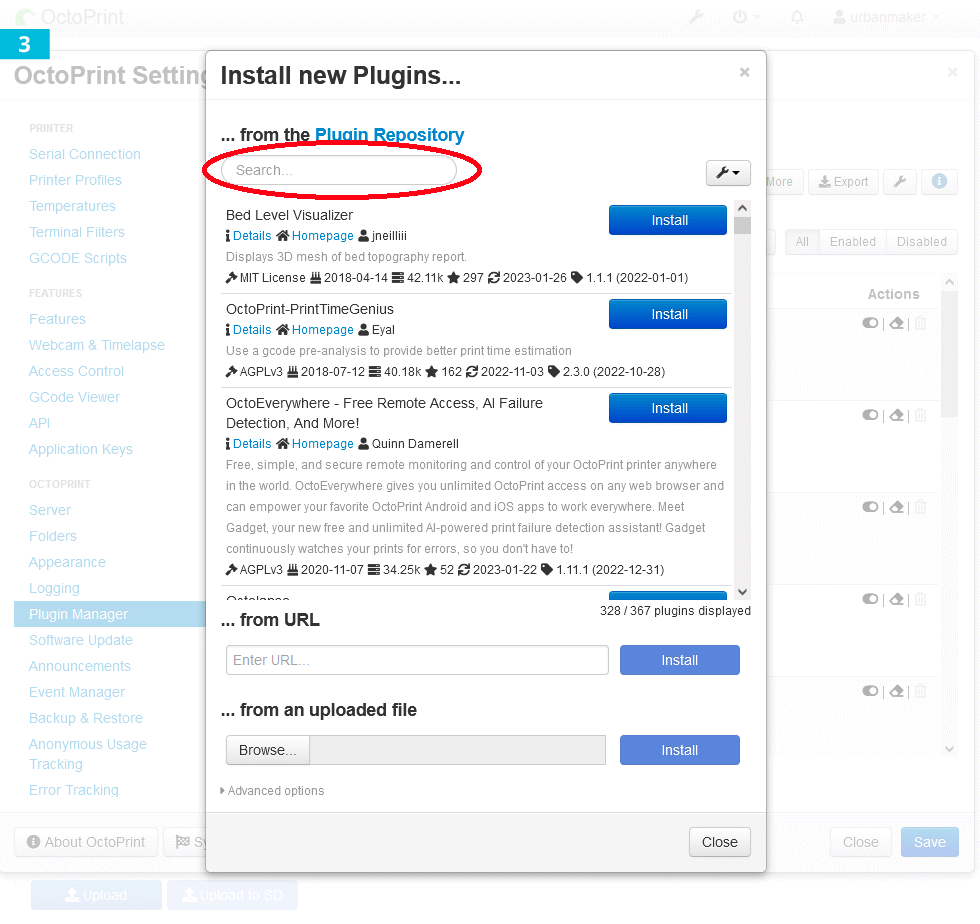
- On the left side select Plugin Manager tab and then click on „+ Get More“ in the upper right
- Click on „Search“
- Enter „Continuous Print“ and then „Install“
- After the installation is finished click („Done!“ appears in the last log line) and a popup appears, click „Restart now“
- Confirm by clicking "Proceed"
- After the Raspberry Pi is restarted, click on „Reload now“
- Click on the wrench icon in the upper right again
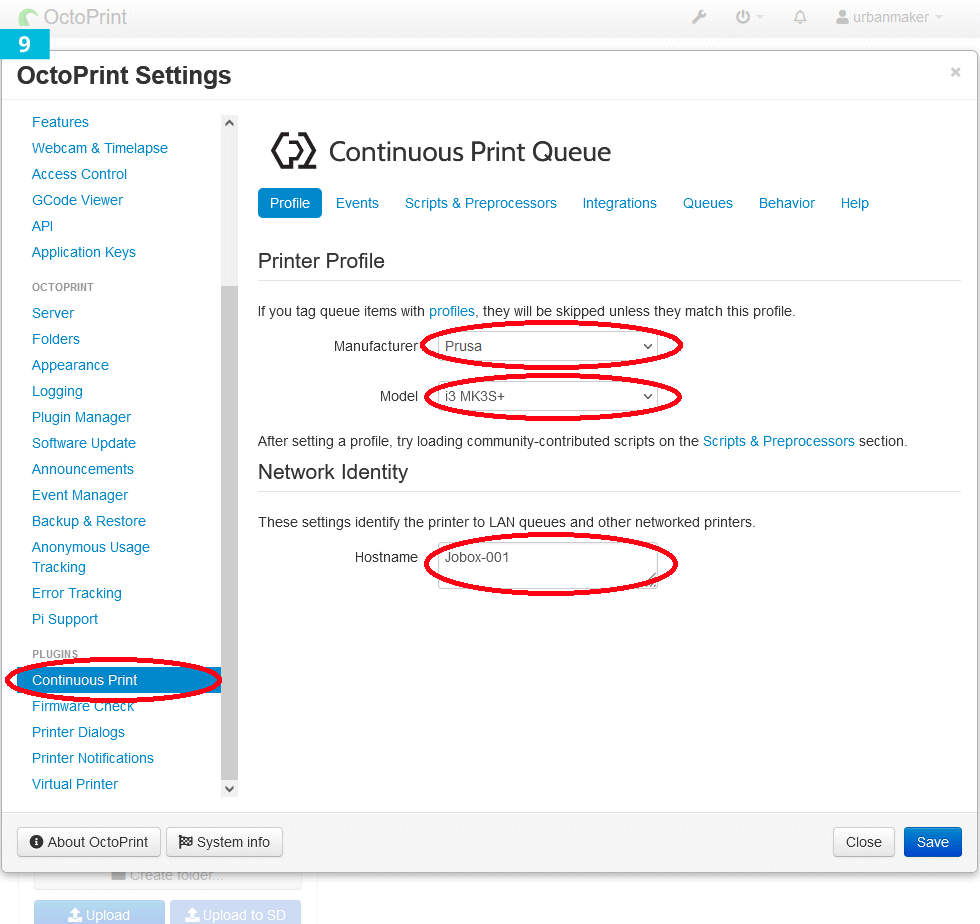
- Select „Continuous Print“ tab in the plugins section (left side), than click on "Profiles" tab. Select Profile Prusa, i3 MK3S+ and choose some name (e.g. JobOx 01).
- Now choose „Scripts & Preprocessors“ tab. Click on the edit-icon of the „Bed Clearing“ line
- Remove GCODE lines starting with "M18..." and "@pause..." like shown on screenshots
- Confirm by clicking „Done“
- Select the tab "Behavior" set „Upload Action“ to „Do nothing“ confirm by pressing „Save“
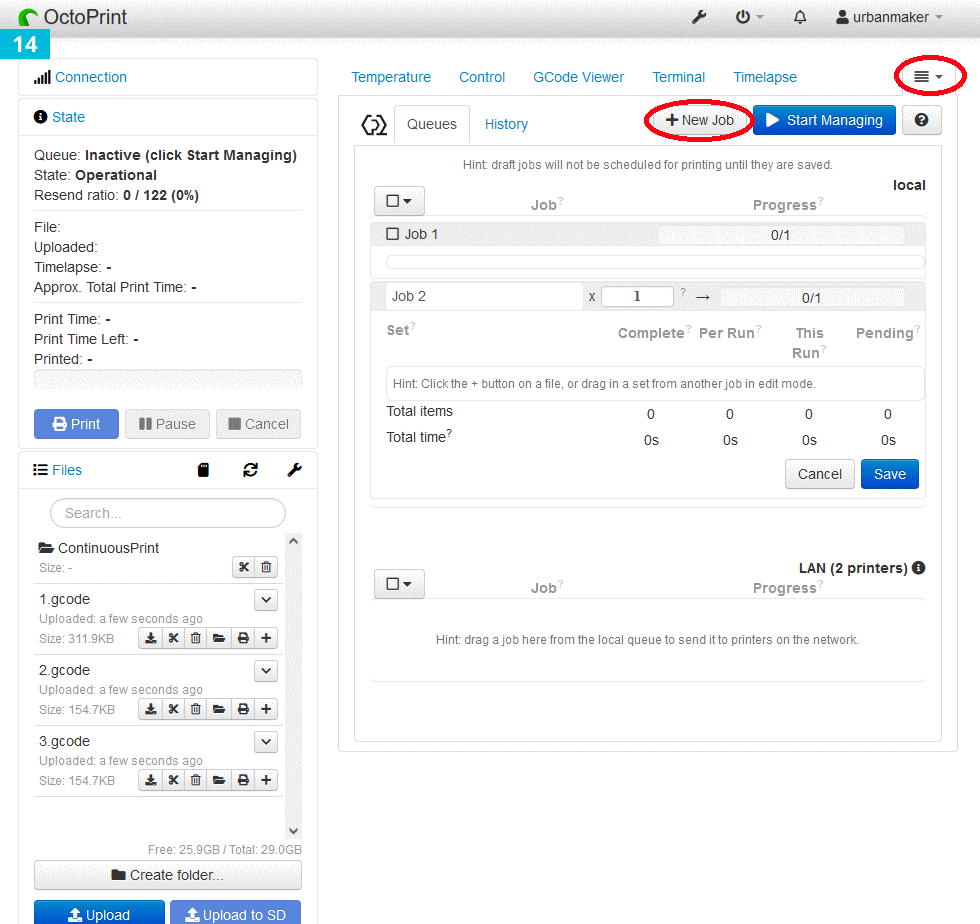
- Click on menu icon of Continuous Print in the upper right area and press „+ New Job“
- Add your GCODES using „+“ and confirm by pressing „Save“. To start the queue press „Start Managing“.
- Please note, all GCODES in the queue must be created using a JobOx slicer profile. Otherwise loading and ejecting Puild Plate will not work.


Karmen 3D (hardware based / free)

Karmen3D is a third party service developed and provided by Fragaria. To oppearte with MK3/MK4 it requires an additional hardware like Karmen Pill (plug-and-play solutions) or a regular Raspberry Pi with preinstalled Octoprint or Klipper OS. Karmen service is cloud based and allows you managing your printers remotely. Registration and usage is currently free of charge.
Karmen3D: Revolutionizing 3D Printing Management
Karmen is an innovative cloud-based workspace that facilitates the remote control and management of your 3D printers. It boasts a range of advanced features, including automatic fail detection, rendered G-code previews, timelapse videos, and various other functions designed specifically for 3D printers. With Karmen, there's no need for SD cards or offline file transfers - everything can be accessed and controlled online from anywhere.
Key Features:
- Printer control from a single interface: Manage and monitor one or more 3D printers from a single application.
- G-codes management: Cloud storage for print files with the ability to search and sort into folders.
- Live video: Watch your print in progress and stop the printer if something goes wrong.
- Time-lapse: Karmen makes a record of the print for review and sharing with others.
- Teamwork: Share your 3D printers and print files with friends, students and colleagues.
- Upload G-codes from any slicer: Send print jobs from your slicer (Slic3r, PrusaSlicer, Cura) straight to Karmen.
- History: Keep track of who printed what and when.
- Automatic Error Detection: Karmen features artificial intelligence that diligently monitors the printing process via webcam.
- G-code previews: This function enables you to find the correct print job and preview the final print, identifying errors like missing support structures.
The Karmen service is currently free of charge.
Once your account and workspace are set up in the Karmen cloud application, the next step is to connect your 3D printer. Whether you have one, two, or more, it's entirely up to you.
How to Connect Your Printer:
- Karmen Pill (ready plug-and-play solutions)
- Octoprint plugin
- Klipper plugin
Karmen enables you to queue and run G-codes in a print queue. If you have a JobOx bed-exchange system, the entire process becomes a breeze. For detailed information, read this documentation and follow a forum.
SimplyPrint (hardware based / subscription with discount for JobOx users)

Simplyprint is a professional server based printer management solution targeted to printing farm, businesses running its own production and also to hobby/enthusiast users who would like to enhance their workflow. It brings a lot of functionality to your printers including remote connectivity, live monitoring, print queue and history, cloud slicer and automation.

To run your Prusa MK3/MK4 printer with SimplyPrint system, you will require a Raspberry Pi to install the software. One Raspberry Pi can be connected to multiple printers.
Simplyprint offers different subscription plans including a free one. However to run an automation feature you will need to choose the "Print Farm" plan (currently $34,99/Month - includes connection of 10 printers ! - cancel any time and 30 day money back guarantee).
SimplyPrint offers JobOx users a discount of 25% on "Print Farm" plan for 4 month.
Discount code: jobox-25
You can find further detail on the SimplyPrint JobOx integration page here:
https://simplyprint.io/compatibility/prusa-i3-mk3s-plus-jobox
A more detailed instruction on how to setup SipmplyPrint in order to run with JobOx will follow shortly. For now you can contact a support team from SimplyPrint to get guidance.
Print & Go (hardware based / subscription)

Print&Go is professional server based printer management solution targeted to businesses running its own production or printing farm. To run your Prusa MK3 printer with Print&Go system, you will require an additional dedicated WiFi capable node hardware which will be provided to you by Print&Go.
- Already a Print&Go user? Fill the form (https://printandgo.tech/contact-us-autoremove/) for requesting the AutoRemove Pack, needed for managing Prusa MK3 + Jobox printers in your Print&Go account.
- You don't have a Print&Go account yet? Request a 30-day free trial here: https://printandgo.tech/contact-us-autoremove/
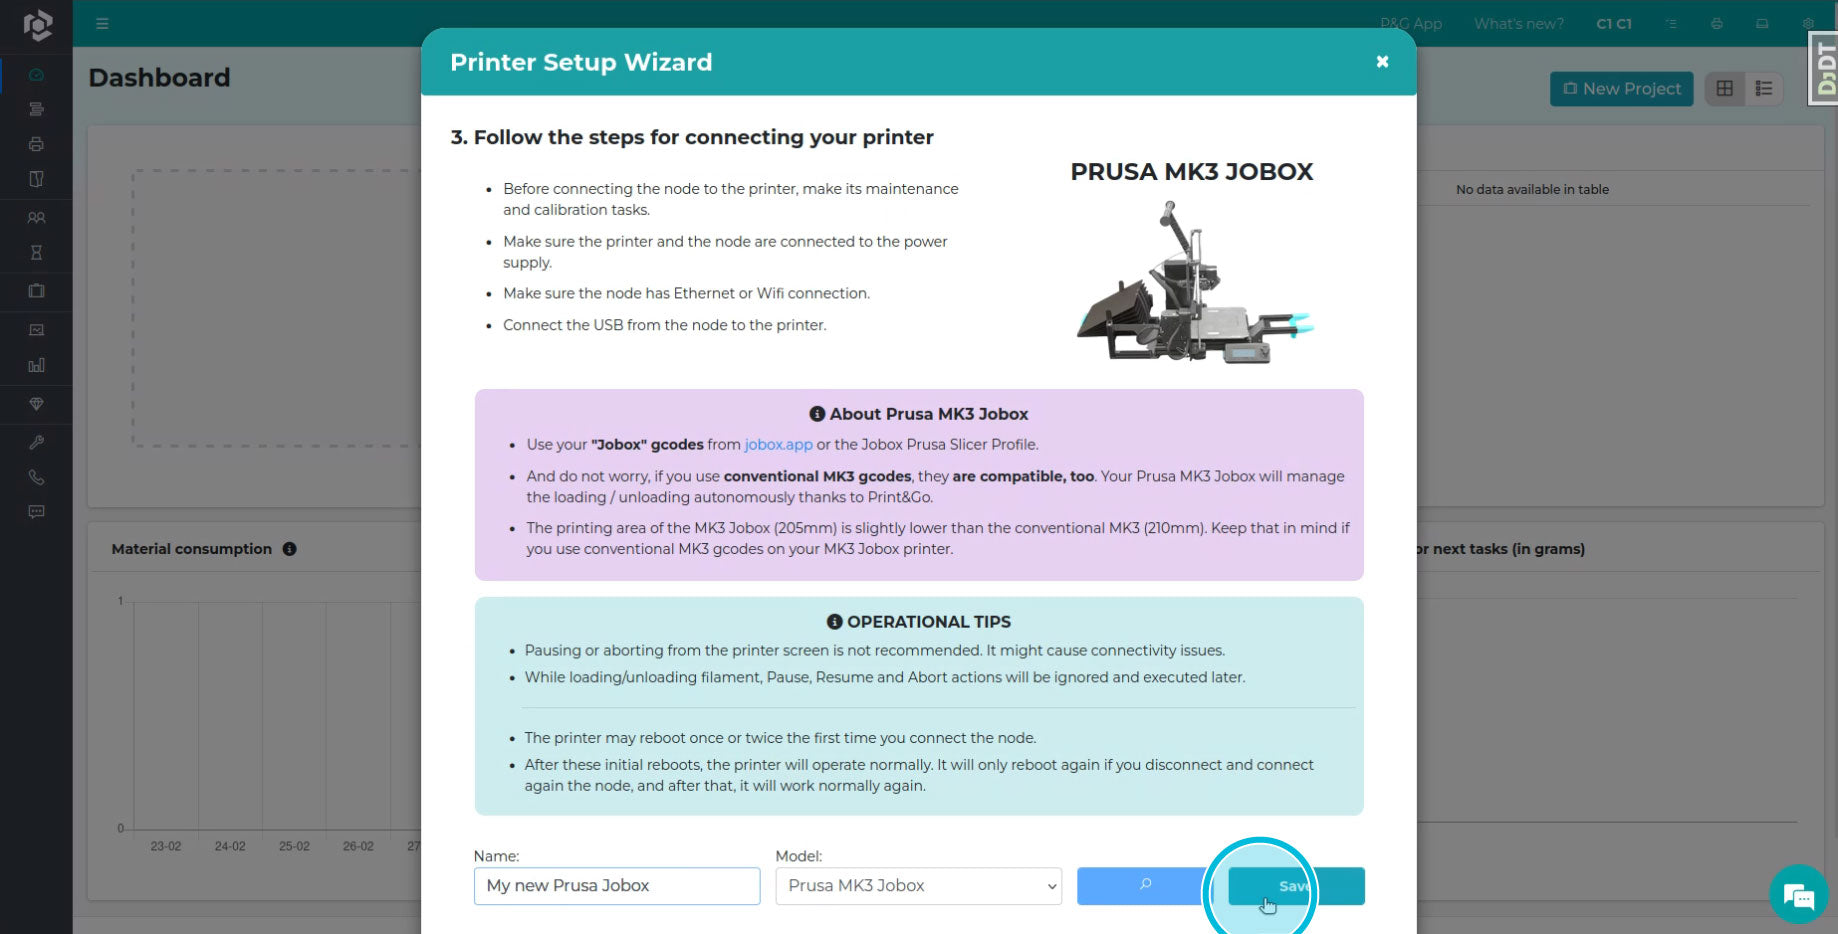
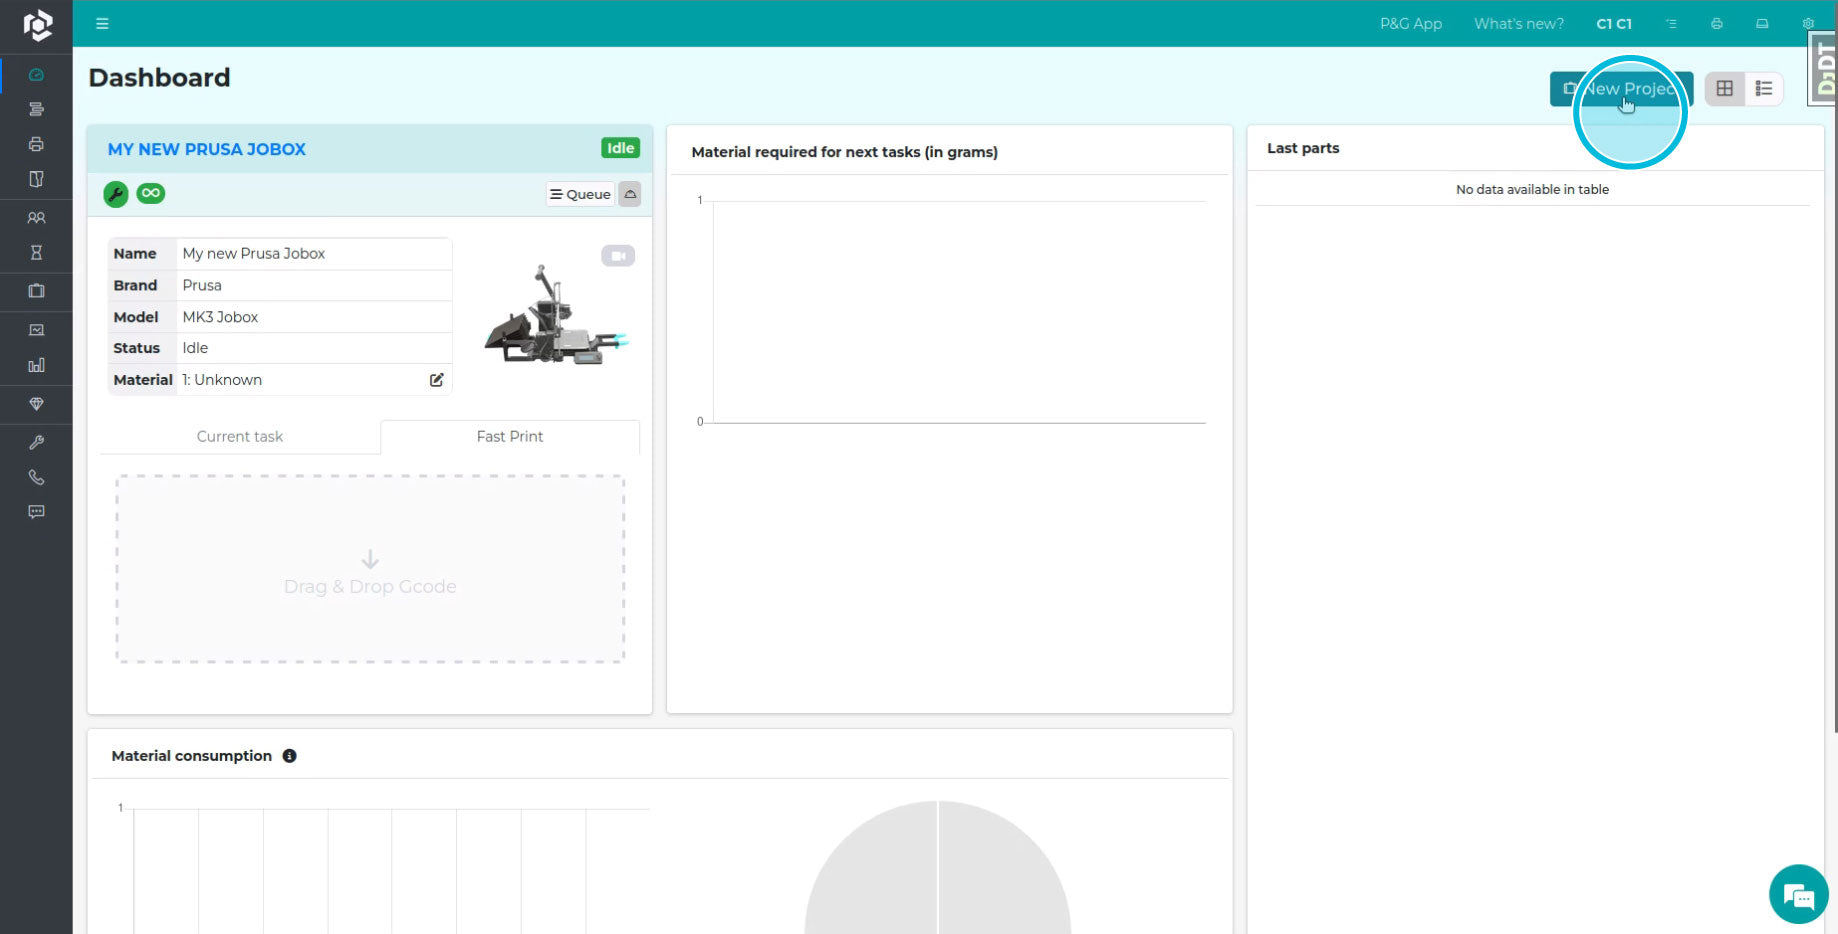
- Create your printers in the "Printers" page. Create them with the "Prusa MK3 Jobox" model.
- The AutoRemove feature (the automatic triggering of your enqueued files to the printer) is disabled by default. If your printer can activate the Autoremove, you will see a grey infinity icon.
- Go to the Printer's page and activate the AutoRemove checkbox. There, you can modify the "AutoRemove Delay". This is the safety delay, in seconds, between the auto-retiring of the piece and the auto-starting of the next file in the queue
- Once activated, the printer will have a green infinity icon, and the printer will auto-start the next files in the queue.
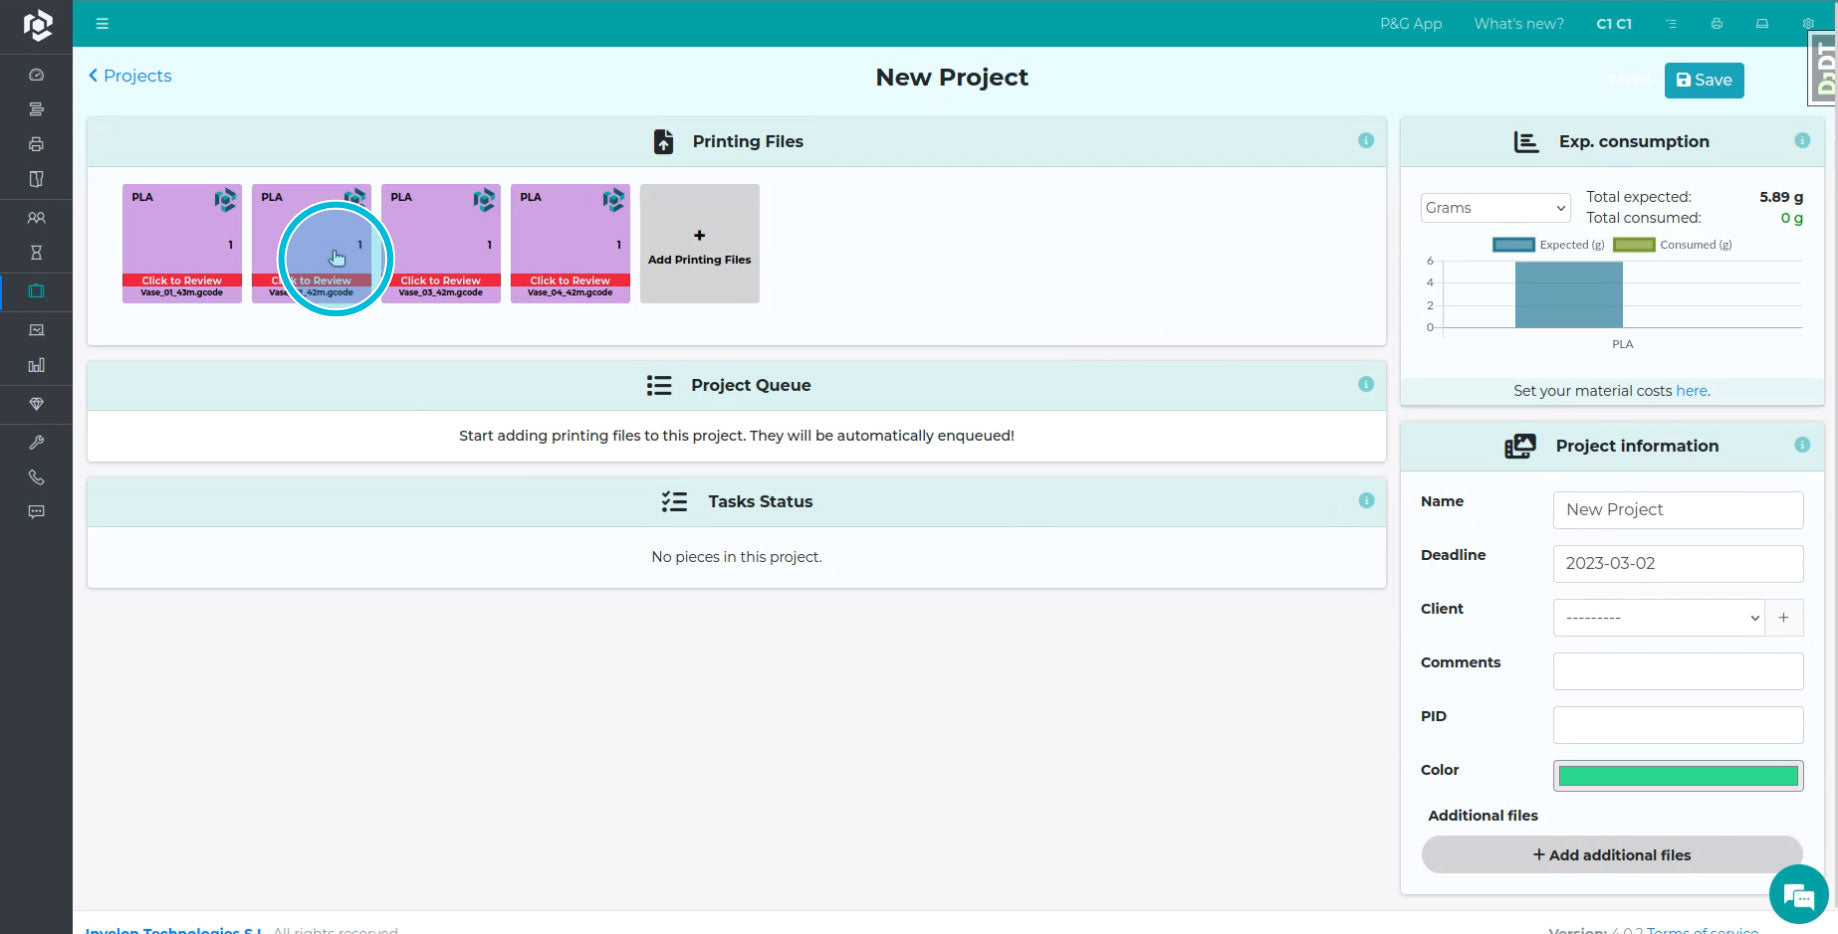
- Upload files to Print&Go and enjoy a 24/7 production with Print&Go + Jobox!


Please note: Thanks to JobOx integration, Print&GO software is able adding the sequence for loading and ejecting to your GCODE files automatically. However, the Print&GO manager is not yet able analyzing the margins of imported files and will accept and process any GCODE, even if it is outside of allowed printing area and is not compatible for using with JobOx. We highly recommend using our dedicated JobOx profiles for your slicer in order to ensure the compatibility of your GCODE file.
Repetier (hardware based / partly free)
Repetier server is a print management software which can be installed on your own hardware. There are versions for Raspberry Pi, Windows, Linux and Mac. Repetier server can be used for two printers for free. To operate with more printers a "light" or "pro" version is needed (one time payment without subscription). Read more here: www.repetier-server.com
Please note: the method provided below is not tested yet! We prepared this rough guidance based on information provided by Repetier in their support forums and user manual (se sources below).
According to Repetier, the only step which is need to be done is sending a corresponding command to the server (perhaps using _console):
@autostartNextJob (if you are using Repetier version 1.2.0 or newer)
@autostart_next_job (if your Repetier version is older than 1.2.0)
Since the loading and ejecting routine for JobOx is already included in your GCODE file (JobOx slice profile is mandatory!) no additional code is needed (neither before nor after a print). After the printing job is finished and the building plate is ejecting the next print job in the queue will be started automatically.
Sources:
https://forum.repetier.com/discussion/8763/sum-grams-of-filament-on-queue-and-other-tricks
https://www.repetier-server.com/manuals/1.2/index.html
(see Advanced Themes > Server Commands)
Implementation API
If you are a developer and would like to implement JobOx system support into your product or your favorite project, please check our API section. Also if you are an enthusiast and would like to introduce how to run JobOx with your favorite system not yet listed here, please don't hesitate to get in touch. We would be glad adding your guidance to this list in order to share it with other users who can benefit from it.
- Choosing a selection results in a full page refresh.
- Opens in a new window.